Quantcast
Channel: Kent Weare's Integration Blog
Viewing all 75 articles
Browse latest View live

Packt Publishing reaches 1000th book milestone

$
0
0
Over the past couple years I have had the chance to work with Packt on two BizTalk titles:
During this time Packt has been very active in producing high quality BizTalk books but that is not all.  They are about to release their 1000th book which is definitely an impressive milestone.  As part of this celebration, Packt has a special offer that they have extended to the public.  Please click on the image below for more information.


BizTalk 2010 R2 CTP: Azure Service Bus Integration–Part 4 Sending Messages to Service Bus Topics

$
0
0


Back again with Part 4 in this series.  This time around we are going use BizTalk to send a message to an Azure Service Bus Topic using the new SB-Messaging Adapter.

What is the difference between a Service Bus Queue and Topic?

Conceptually they are very similar in the sense that they both provide a durable message store within Azure where Publishers can publish messages and Consumers can consume messages.  Queues store messages in a First In First Out (FIFO) manner and provide a competing consumer experience.  What this means is that if we have two queue clients that are polling the same queue then only one client will receive a copy of any given message.

Topics provide some additional features that really support a Publish/Subscribe (Pub/Sub) architecture.  Topics allow for multiple clients to subscribe to the same Topic through subscriptions.  Subscriptions also support SQL92 expressions and allow a consumer to filter messages out based upon BrokeredMessage Properties.

Scenario

In Part 3 I  discussed how our Work Order Management system can notify our Major Account System when an Estimated Time of Restore is available.  This allows Major Account Representatives the ability to reach out to customers to share the good/bad news about when their power will be restored.

We are going to build upon this scenario but instead of sending all messages to a Queue we are going to send it to a Azure Service Bus Topic instead.  Due to the , fictional, growth of our company there are now two distinct groups responsible for Major accounts.  One for the city of Edmonton and another for the city of Calgary. (Both of these cities exist within Alberta, Canada)  Each queue Subscription client will now subscribe to events for their city.  BizTalk will however just send messages to one Topic and let the Service Bus work out which message needs to be delivered to each client.

Modifying Client Application(s)

Calgary Application

  • Once again we are going to leverage the work that we have done in previous posts(In this case Part 3).  The first thing we will do is rename our previous C# Console project from BrokeredMessageFromBizTalk to BrokeredMessageFromBizTalkCalgary.

image

  • Next we will modify the namespace for the Program.cs file so that it reflects the name of the project (BrokeredMessageFromBizTalkCalgary).  Note we will leave the namespace of our EstimatedTimeToRestore.cs as is.
  • Below is the entire code listing for our Calgary Client.  Within this code we will use our connectivity parameters to establish a connection.  Once we have a connection we will see if the Calgary subscription currently exists.  If it does not, we will create it.  We will also create it and add a SQLFilter.  This particular filter is interested in messages where the Address Brokered Message Property equals “Calgary”.

using System.IO;
using System.Runtime.Serialization;
using Microsoft.ServiceBus;
using Microsoft.ServiceBus.Messaging;
using BrokeredMessageFromBizTalk;


namespace BrokeredMessageFromBizTalkCalgary
{
    class Receiver
    {
        const string TopicName = "<your_topic>";
        static string ServiceNamespace = "<your_namespace>";
        static string IssuerName = "<your_owner>";
        static string IssuerKey = "<your_key>";
        static string connectionString = String.Format("Endpoint=sb://{0}.servicebus.windows.net/;SharedSecretIssuer={1};SharedSecretValue={2}",
             ServiceNamespace, IssuerName, IssuerKey); 

        static void Main(string[] args)
        {
           
            TokenProvider tokenProvider = TokenProvider.CreateSharedSecretTokenProvider(
                Receiver.IssuerName, Receiver.IssuerKey);
            Uri uri = ServiceBusEnvironment.CreateServiceUri("sb", Receiver.ServiceNamespace, string.Empty);
            MessagingFactory messagingFactory = MessagingFactory.Create(uri, tokenProvider);


            // Create a "Calgary" SQLFilter
           SqlFilter calgaryFilter = new SqlFilter("Address = 'Calgary'");

            //Check to see if Calgary Subscription exists, if it does not then create it
            NamespaceManager namespaceManager = NamespaceManager.CreateFromConnectionString(Receiver.connectionString);
            if (!namespaceManager.SubscriptionExists(Receiver.TopicName, "Calgary"))
            {

                //Create Calgary Subscription with our calgaryFilter
                namespaceManager.CreateSubscription(Receiver.TopicName, "Calgary", calgaryFilter);

            }
            //Create Subscription Client using Peek/Lock Mode
            SubscriptionClient sc = messagingFactory.CreateSubscriptionClient(Receiver.TopicName , "Calgary", ReceiveMode.PeekLock);
            BrokeredMessage bm;
            while ((bm = sc.Receive(new TimeSpan(hours: 0, minutes: 0, seconds: 20))) != null)
            {
                var data = bm.GetBody<EstimatedTimeToRestore>(new DataContractSerializer(typeof(EstimatedTimeToRestore)));
                Console.WriteLine(String.Format("An estimated time of restore {0} has been received for {1}", data.RestoreTime, data.CustomerName));
                Console.WriteLine("Brokered Message Property Address has a value of {0}", bm.Properties["Address"]);
                //Remove message from Topic
                bm.Complete();
            }

        }
    }
}

Edmonton Application

  • Within our existing Visual Studio solution we are going to add another C# Console Application called BrokeredMessageFromBizTalkEdmonton.

image

  • Within this application we will create a reference to our “Calgary” project.  We need to do this so that we have access to the EstimatedTimeToRestore class. This is accomplished by including the following statement:
    • using BrokeredMessageFromBizTalk;
  • Otherwise we can simply copy and past the “Calgary” Program.cs code and adapt it for our Edmonton scenario.The main areas that we need to focus on are creating a unique Edmonton Subscription and ensuring that our Edmonton filter matches Edmonton messages and not Calgary messages.

using System;
using System.Collections.Generic;
using System.Linq;
using System.Text;
using System.Threading.Tasks;
using System.IO;
using System.Runtime.Serialization;
using Microsoft.ServiceBus;
using Microsoft.ServiceBus.Messaging;
using BrokeredMessageFromBizTalk;


namespace BrokeredMessageFromBizTalkEdmonton
{
    class Receiver
    {
        const string TopicName = "<your_topic>";
        static string ServiceNamespace = "<your_namespace>";
        static string IssuerName = "<your_owner>";
        static string IssuerKey = "<your_key>";
        static string connectionString = String.Format("Endpoint=sb://{0}.servicebus.windows.net/;SharedSecretIssuer={1};SharedSecretValue={2}",
             ServiceNamespace, IssuerName, IssuerKey);

        static void Main(string[] args)
        {

            TokenProvider tokenProvider = TokenProvider.CreateSharedSecretTokenProvider(
                Receiver.IssuerName, Receiver.IssuerKey);
            Uri uri = ServiceBusEnvironment.CreateServiceUri("sb", Receiver.ServiceNamespace, string.Empty);
            MessagingFactory messagingFactory = MessagingFactory.Create(uri, tokenProvider);


            // Create a "Edmonton" filtered subscription
            SqlFilter edmontonFilter = new SqlFilter("Address = 'Edmonton'");

            //Create NamespaceManager object and see if Edmonton Subscription exists for our Topic
            NamespaceManager namespaceManager = NamespaceManager.CreateFromConnectionString(Receiver.connectionString);
            if (!namespaceManager.SubscriptionExists(Receiver.TopicName, "Edmonton"))
            {
                //If the Subscription does not exist, create it
                namespaceManager.CreateSubscription(Receiver.TopicName, "Edmonton", edmontonFilter);

            }

            //Create Subscription client and use Peek/Lock mechanism for delivery
            SubscriptionClient sc = messagingFactory.CreateSubscriptionClient(Receiver.TopicName, "Edmonton", ReceiveMode.PeekLock);
            BrokeredMessage bm;
            while ((bm = sc.Receive(new TimeSpan(hours: 0, minutes: 0, seconds: 20))) != null)
            {
                var data = bm.GetBody<EstimatedTimeToRestore>(new DataContractSerializer(typeof(EstimatedTimeToRestore)));
                Console.WriteLine(String.Format("An estimated time of restore {0} has been received for {1}", data.RestoreTime, data.CustomerName));
                Console.WriteLine("Brokered Message Property Address has a value of {0}", bm.Properties["Address"]);
                //remove message from Topic
                bm.Complete();
            }

        }
    }
}

Creating Topic

Much like we did in the previous blog post where we created a Service Bus Queue, we can also create a Service Bus Topic from the http://windowsazure.com portal

  • To create a new Topic simply click on the New Topic button.

image

  • Provide a Topic Name.  For the purpose of this post I am using PowerRestoreTopic.  We can then leave the default settings as is.

image

Note: We can also create Topics via code by using the NamespaceManager class much like we did for Subscriptions.  I decided to use the portal just to demonstrate that we have a few options when creating Service Bus artifacts.

Modifying BizTalk Solution

Once again we are going to keep the BizTalk Solution changes to a minimum and will continue to use a Messaging Only scenario.

  • The first change that we are going to make is to our BrokeredMessagePropertySchema by adding our Address field.  Note if you recall from our C# projects that we created SQLFilters based upon the Address property being equal to either Calgary or Edmonton(depending upon the application).  By adding this property to our PropertySchema we can now promote this value in our XSD.image
  • Next we will modify the ETRfile.xsd and promote the Address field.  We will then map this field to the property we just created in our PropertySchema.

image

  • We can now deploy our BizTalk Application and bounce any related Host Instances.
  • While inside the BizTalk Administration Console, we need to modify our SB-Messaging Send Port called SendEstimatedTimeToRestoreToAzure.  Previously we were using this Send Port to send messages to a Service Bus Queue.  We will now be sending messages to a Topic which uses the same convention within the URI.  Instead of including our Queue Name in the URI we need to specify the Topic Name.  In our scenario I am going to specify PowerRestoreTopic.

image

  • Our Authentication tab remains unchanged. We will continue to use the same Issuer Name and Issuer Key as in our previous example.

image

  • Finally, we need to click on the Properties tab so that we can enable our custom Brokered Message Properties. To enable these properties we need to provide the namespace for our Property Schema that we previously modified.  As you may recall, we added a property called Address that we will use to route messages within our Azure Topic Subscription.

image

Testing our Solution

  • We are going to leverage the Receive Location that we created in Part 3 of this blog series.  Our solution is expecting messages that conform to the ETRfile.xsd schema.  Below, I have included two sample files.  One contains an Address that belongs in Edmonton and the other one has an Address that belongs in Calgary.  We will drop both of these files within the same receive location and they will be sent to the same PowerRestoreTopic.

image

  • Once the messages have been sent we will launch our two client applications (Calgary and Edmonton).  The expectation is that the Calgary application will retrieve the Calgary Message and the Edmonton application will retrieve the Edmonton Message.
  • As expected, our Edmonton client retrieved the Edmonton message and the Calgary client retrieved the Calgary message.

image

Conclusion

In this post we used existing BizTalk skills to send typed messages to an Azure Service Bus Topic.  We promoted a property within BizTalk that was converted to a Brokered Message Property that can be used within Subscription Filters in order to route messages between different consumers.

Once again the experience is very seamless. I really do like the .Net API for Service Bus.  I think it is intuitive and is very logical.  As simple as it is to use this API it is hard to imagine anything being much simpler. But it has been done. The BizTalk team has made interfacing with the Service Bus even easier than using the API.  From a BizTalk perspective the Service Bus is just another endpoint and requires some additional configuration.  I do find that this aligns with some of the early goals of BizTalk.

BizTalk 2010 R2 CTP: Azure Service Bus Integration–Part 5 Sending messages to Service Bus Queues using Sessions

$
0
0


What are Service Bus Sessions?

Service Bus Sessions are actually a rather broad subject as there are a few different scenarios in which they can be used.  At its simplest description I consider Service Bus Sessions to be a way to relate messages together.  More specifically here are a few ways in which they can be used:

  • To address the Maximum message size constraint.  Service Bus Queues can support messages that have a size of 256 KB or smaller.  Using Sessions allow us to break a larger message down into smaller messages and then send them over the wire.  A consumer, or receiver, can then receive all of these message “chunks” and aggregate them together.
  • To support receiving a related set of messages in First In First Out (FIFO) fashion
  • Allows for affinity between a consumer and a Service Bus Queue in competing consumer scenarios.  Imagine having 3 consuming clients all trying to receive messages from the same Service Bus Queue.  Under normal circumstances you cannot be assured that one receiver will receive all messages within a message set.  One can expect the messages to be distributed amongst the clients as each consumer “competes” for the right to process a particular message.  In this scenario, once a receiver has started to process a message within a session, that consumer will process all messages within that session barring some sort of application crash.
  • In some scenarios, using a Service Bus Session allows for routing of messages.  Within a receiver, you can specify an explicit Session that you are interested in.  So in some ways a Session can be used almost like a filter.  I am not suggesting that this approach be used instead of Service Bus Topics/Subscriptions, but there may be a specific business requirement to do this.

Why are Service Bus Sessions important in BizTalk processing?

BizTalk deals with a variety of different messaging scenarios in many different industry verticals.  Supporting Service Bus Sessions is just another tool in the the BizTalk toolbox for supporting new requirements.  A scenario that I came up with is dispatching messages.  For instance if we wanted to load up a field worker with all of his orders, wouldn’t it be nice to have all of his orders sent to him as a batch?  As opposed to him receiving some of his orders only to receive more orders later on.  For instance he may have driven by one of his customers already because the messages that he receive were out of order and other field workers were also receiving their orders which delayed him in receiving all of his.

image

Putting it together – Modifying Service Bus Queue

A pre-requisite for this type of messaging scenario to work is configuring our Service Bus Queue to support Sessions.  This can be enabled in a couple different ways:

  • When creating a queue from within the Azure Portal, we can check the Enable sessions checkbox.

image

  • When using the QueueDescription class we can set the RequiresSession property to true.

NamespaceManager namespaceClient = new NamespaceManager(serviceUri, credentials);

if (!namespaceClient.QueueExists(Sender.QueueName))
        {

            QueueDescription queueDescription = new QueueDescription(Sender.QueueName)
            {
                RequiresSession = true
            };
            namespaceClient.CreateQueue(queueDescription);
          
        }

BizTalk Configuration

In order to keep the solution very simple, we will create:

  • Two Receive Ports
  • A Receive Location for each Receive Port.  The purpose of these Receive Locations is to simply inject messages into BizTalk so that we can set the SessionID property on the Send Ports.
  • 2 Send Ports
    • One for Mike
    • One for Joe
  • Each Send Port will have a filter for the corresponding Receive Port.  Within each Send Port we will configure a SessionID .

image

The other Send Port will use the same URI, however it will have a different SessionID value which will be Joe.

image


Service Bus Queue Client

The code below will make a connection to our session-ful Service Bus Queue and retrieve all messages that have a SessionId of Mike.

using System;
using System.Collections.Generic;
using System.Linq;
using System.Text;
using System.Threading.Tasks;
using Microsoft.ServiceBus;
using Microsoft.ServiceBus.Messaging;
using System.Runtime.Serialization;
using BrokeredMessageToBizTalk;

namespace RetrieveServiceBusSession
{
    class Receiver
    {

        const string QueueName = "<your_sessionful_queue>";
        static string ServiceNamespace = "<your_namespace>";
        static string IssuerName = "<your_issuerName>";
        static string IssuerKey = "<your_IssuerKey>";
        static void Main(string[] args)
        {
            TokenProvider credentials = TokenProvider.CreateSharedSecretTokenProvider(Receiver.IssuerName, Receiver.IssuerKey);
            Uri serviceUri = ServiceBusEnvironment.CreateServiceUri("sb", Receiver.ServiceNamespace, string.Empty);

            MessagingFactory factory = null;

            factory = MessagingFactory.Create(serviceUri, credentials);

            QueueClient sessionQueueClient = factory.CreateQueueClient(Receiver.QueueName);

            //Create sessionQueueClient and subscribe to SessionIDs that have a value of "Mike"
            MessageSession sessionReceiver = sessionQueueClient.AcceptMessageSession("Mike", TimeSpan.FromSeconds(60));
            BrokeredMessage receivedMessage;

                while ((receivedMessage = sessionReceiver.Receive(TimeSpan.FromSeconds(60))) != null)
                {
                    var data = receivedMessage.GetBody<PowerOut>(new DataContractSerializer(typeof(PowerOut)));
                    Console.WriteLine(String.Format("Customer Name: {0}", data.CustomerName));
                    Console.WriteLine("SessionID: {0}", receivedMessage.SessionId);
                    //remove message from Topic
                    receivedMessage.Complete();
                }
          
            Console.WriteLine("All received on this session...press enter to exit");
            Console.Read();
        }
    }
}


The code itself is very similar to that of some of my previous blog posts on ServiceBus integration.  The main difference is instantiating a MessionSession object.

MessageSession sessionReceiver = sessionQueueClient.AcceptMessageSession("Mike", TimeSpan.FromSeconds(60));

Within this line of we are indicating that we want to receive messages that belong to the Mike Session.  We can also provide a TimeSpan as an argument to specify the duration in which we want to receive from this Session.  Setting this value is more useful when we are looking for any available Session as it allows all messages within a Session to be processed before moving onto the next Session.

Testing

I have two sets of messages here.  Two of the messages will be routed through the Joe Send Port and subsequently the SessionID for these two messages will be set to Joe. The other two messages will be routed through the Mike Send Port and subsequently will have its SessionID property set to  Mike.

image

As mentioned previously, both Send Ports are configured to send to the same Service Bus Queue.  When we do run our client application, the expectation is that messages belonging to the Mike Session will be retrieved.  The Joe Messages will remain in the Queue until another receiver pulls them down or the the Time To Live (TTL) threshold has been exceeded.

When we start our Consumer application we do discover that the “Mike” messages are processed.

image

So what happened to the other messages?

The “Joe” messages are still in our Queue.  If we navigate to our Windows Azure Portal, we will discover that our Queue Length is set to 2.

image

So how do we get these messages out?

We have a couple options, we can create another MessageSession instance and retrieve all Messages belonging to the Mike Session or we can not specify a Session and our client will look for the next available Session which in this case will be the Mike Session.

Let’s go with the second option and retrieve the next available session.  In order to do so we need to change the following line of code from

  MessageSession sessionReceiver = sessionQueueClient.AcceptMessageSession("Mike", TimeSpan.FromSeconds(60));

to

  MessageSession sessionReceiver = sessionQueueClient.AcceptMessageSession(TimeSpan.FromSeconds(60));

We essentially are no longer specifying a specific Session that we are interested in and are now interested in any Session.

I will now process another 4 files; 2 will belong to the Joe Session and 2 will belong to the Mike Session.  What we expect to happen is that all 4 Joe messages will be processed since it is the next available Session.

image

So this proves that we have In Order Delivery occurring at the Session level.  Initially our Mike Session was processed which left our Joe messages outstanding.  We then loaded 4 more messages to the Queue and since the Joe messages were first in, they were processed first.  Our remaining 2 messages that now belong to Mike can be retrieved by starting up our Client Application once again.

image

Note:

Within my BizTalk Send Ports I statically configured my SessionID.  This isn’t very practical in the “Real World” but it was easy to demonstrate for the purpose of this blog post.  Much like other BizTalk context properties the SessionID property is available and can be set dynamically within an Orchestration Message Assignment shape or a Pipeline Component.

image

Conclusion

Overall I found this functionality pretty neat. I do think that it is another capability that we can leverage to support more granular control over message processing.  I do like the opportunity to group messages together and treat them as a batch.  This also works when dealing with message size limitations as we can stich a bunch of smaller messages together that collective make up a large message.

BizTalk 2010 R2 CTP meet BizTalk 2013 Beta

$
0
0

Microsoft released some exciting news on Monday for people who live and breathe Middleware.  They have released BizTalk 2010 R2 CTP’s successor: BizTalk 2013 Beta.  The new name signifies a major release and rightfully so, it does deserve it.

Back in June 2012, I was at TechEd North America where the BizTalk team provided a glimpse into the future of BizTalk.  At that point, I did feel that they were adding enough new functionality to warrant the full release but it was only until today that they officially announced the name change.

What is included in this release?

Many of the features that they did speak to at TechEd have been included in the CTP including:

  • Integration with Cloud Services via SB-Messaging Adapter
  • Support for RESTful Services (both Send and Receive)
  • Platform Support (Windows Server 2012, Visual Studio 2012 and SQL Server 2012)
  • Azure BizTalk VMs (IaaS)

The BizTalk team has now added some more features within the Beta including:

  • Enhanced SharePoint Adapter (No longer do we need to install an agent(web service) on the SharePoint Server)
  • Secure FTP (SFTP) Adapter
  • ESB Toolkit Integration
  • Dependency Tracking (The dependencies between artifacts can now be viewed and navigated in Admin console)
  • Improvements to Dynamic Send Ports (ability to set host handler per adapter, instead of always using the default send handler of the adapters)

After I discovered the Microsoft post I sent it off to my team and a lively discussion was held.   There was a bit of a debate over which of the feature we can benefit from the most.  The interesting thing is that we can benefit from each of these new features. 

SharePoint Adapter

We do a lot of work with SharePoint and in addition to running a multi-node BizTalk farm we also have a multi-node SharePoint farm.  The BizTalk team does not like installing the Adapter Web Service on the SharePoint Web Front ends so you can imagine that the SharePoint team isn’t a big fan of it either.  To make things worse, try to perform an upgrade from BizTalk 2009 to BizTalk 2010 and ask a SharePoint person to come in on the weekend to assist with the install.  Not going to make many friends that way.

Secure FTP (SFTP) Adapter

It is great to see a native SFTP adapter being included “in the box”. Back in BizTalk 2009, Microsoft provided an FTPS adapter but that protocol is not nearly as pervasive as SFTP, in my opinion anyways. As you may have seen on my blog previously, I do have several posts about a 3rd party SFTP adapter.  The adapter has been a pretty good adapter for us.  Yes there have been a few bugs, but the vendor has always provided top notch support.  However, it is a pain to deal with another vendor, pay another invoice and get license keys. 

ESB Toolkit Integration

We don’t do much with ESB itineraries but we do heavily leverage the Exception Management Portal that is included in the toolkit.  We have made some small modifications, to the exception portal,  and many of our Business Units rely upon it for Business level exceptions that occur within the Middleware or other systems like SAP.  There are many opportunities for improvement and the installation is certainly one of them.  So even though the description on the Microsoft link is rather vague, I am really hoping for a seamless experience this time around.

Dependency Tracking

We have a fairly large BizTalk environment.  It is something that we have been building upon for the last 7 years.  I can confidently say that our Business runs on top of BizTalk.  If BizTalk doesn’t function, there are widespread impacts to our employees and customers.  A Vice President was asking me about BizTalk and he was purely amazed that it supported so many Business processes within the company.  With that said, we try to leverage common components and leverage previous investments.  Overtime this can be difficult to manage so this feature is definitely welcomed.

Improvements to Dynamic Send Ports

We do have a few different scenarios where we need to determine the route that a message will take at run-time and has been a bit of a pain that these messages will always be processed by the default send handler for that Adapter.  It will be nice to have some more granularity.

RESTful Services

Looking back there have been a few different integration scenarios where could have benefited by a ‘lighter weight’ service construct.  I don’t expect this to be our de facto standard when exposing services but I do recognize the benefit in having a more flexible option than SOAP.

Integrations with Cloud Services via SB-Messaging Adapter

If you have been following my blog recently, I have quite a few posts (Post 1, Post 2, Post 3, Post 4 and Post 5)  on the new SB-Messaging Adapter which allows us to connect Service Bus Queues and Topics.  I actually have a blog post currently in the works with the CTP version but I will now save it and implement it with the new Beta. So far I have been very impressed with this new capability.  It is very easy to get this to work.  It will be this adapter that allows for many(but not all) hybrid integration scenarios with on-premise Line of Business (LOB) systems.  I fully expect BizTalk PaaS to participate in LOB integration scenarios but for those customers who have heavily invested in BizTalk, leveraging the SB-Messaging adapter has many benefits.

Azure VM BizTalk IaaS

I haven’t actually had a chance to try this out.  We do a lot of On-Premise integration so it just hasn’t been a big of a priority for me. I do recognize the value for some people though.  It creates a much lower barrier of entry for some organizations and allows them to get their “feet wet” with BizTalk before investing more significant capital in a larger environment.

Host Integration Services 2013 Beta

In addition to all of these BizTalk features a Beta of Host Integration Services (HIS) has also been released.  This version includes the following updates:
• Data Integration – Several key updates in integration with DB2.
• Application Integration – Updates to Transaction Integrator designer, tools and accounting.
• Network Integration – Direct connectivity from Server/Client to IBM mainframe systems using fully managed TN3270E runtime.
• Message Integration – WCF Channel Support for WebSphere MQ v7.5 and v7.1.
• Platform Support – Introducing the support for Window Server 2012, Visual Studio 2012, SQL Server 2012, BizTalk 2013 and IBM Systems.

Conclusion

From what I have seen with the BizTalk 2010 R2 CTP, the BizTalk team has been working very hard on this next release of BizTalk.  I think they are already demonstrating that the end product will be very solid as they have put together two compelling “pre-releases” of BizTalk.   I really encourage you to download the new bits and take the new BizTalk for a spin.  There are a lot of great features included.

BizTalk 2013 Beta: Azure Service Bus Integration–Dynamic Sent Ports

$
0
0


I started writing this blog post before the Beta was announced and it was probably a good thing that I did not publish it as I now have something else to discuss.  Microsoft has made an enhancement to the configuration that supports Dynamic Send Ports.  More on this later.

This blog post is really about 3.5 years in the making.  You are probably saying what, how is that possible?  BizTalk 2013, nor the Azure Service Bus(in its current form) did not even exist back then.  This is true but a colleague and myself were already thinking of a cloud based pattern to solve a ‘trading partner’ scenario that we were dealing with.

Business Problem

I work in the Utilities industry within a province in Canada.  We have a ‘deregulated’ market when it comes to Electricity and Natural Gas.  What this means is that the market is more open and it provides other opportunities for companies to participate within it.  This deregulation occurred over 10 years ago and the overall goal was to reduce prices to the end consumer.  (The jury is still out on that).

The market is primarily broken up into 4 segments:

  • Generation– Organizations who generate electricity via coal, gas, wind, solar etc
  • Transmission– High voltage Transmission of energy from Generation plants to Distribution Networks
  • Distribution– Organizations that take High voltage feeds and distribute low end voltage to customer’s homes and businesses.  These Distribution businesses are also responsible for capturing  Customers’ usage and providing this information to retailers.
  • Retailers– Are responsible for billing customers for their usage.  Customers can choose who their retailer is but cannot choose who their Distribution company is as it is broken up by Service territory due to the amount of capital investment required in order to provide infrastructure.

image

Note: Image is used for illustrative purposes only and does not necessarily reflect the actual number of companies involved.

As you can probably imagine, there is a need for information to be exchanged amongst these parties.  Amongst the Generation, Transmission and Distribution companies, each company must be aware of demand that their customers are requesting so that the Generation company can produce enough energy.  The Transmission and Distribution companies must also be able of supporting that load on their networks.

From a Distribution standpoint, the segment of the industry that I work in, we need to be aware of Customer management/Enrollment, Energizing and De-energizing customers,  Meter reading and providing consumption data to Retailers so they can bill the customers.

A few years ago the industry was looking to replace its Managed File Transfer solution that facilitated the exchange of this information.  Think of an FTP type application that had an Address book with some scheduling type activities.  This tool moved around flat files that were all based upon different transaction types.  The tool at the time suffered from major reliability issues

At the time, the Service Bus just wasn’t what it is today.  Also if you think there is a lot of skepticism  about the cloud today, it was much, much worse 3.5 years ago.  People were not ready for the cloud back then and as an industry we went a different direction, I thought it would be fun to revisit this problem and look at a way that we could solve this problem today using cutting edge tools like the Azure Service Bus and BizTalk Server 2013.

Within the context of this post we are going to focus on a fairly common problem and that is enrolling new customers.  As I previously mentioned, customers can choose their retailer.  Like most businesses retailers are very interested in on-boarding new customers with incentives.  When a customer does choose to move their business to a new retailer, this retailer needs to inform the Distribution provider that the customer has chosen to switch retailers.  The Distribution provider is then responsible for notifying the old retailer that this customer is now longer a customer of theirs and the Distributor is also responsible for confirming with the new retailer that this customer is now theirs.  From here on in, the Distribution company will send this customer’s consumption (Meter Reads) to the new retailer so that they can bill the customer.

This process is defined as a set of transactions known as the Enrollment transactions and is comprised of three messages:

  • SRR – Switch Retailer Request
  • SRN – Switch Retailer Confirmation for new Retailer
  • SRO – Switch Retailer Confirmation for old Retailer

Implementation

All participants within the market place have their own company identifier.  For this blog post I have created fictitious ids.  Our New Retailer will have an id of 1111, our Old Retailer will have an id of 2222 and our Distribution Company will have an id of 3333.These ids will map to Queues that have been created within the Service Bus.

  1. The New Retailer will send an SRR request to the Distribution Company’s queue called 3333.
  2. The Distribution Company will pull this message, via BizTalk,  off of its queue and communicate with its back end ERP system (not described within this blog post).
  3. BizTalk will then need to send a notification (SRN) back to the new Retailer confirming the enrollment.
  4. BizTalk will also need to send a notification (SRO) to the Old Retailer letting them know that they have lost a customer.

image


Service Bus Configuration

Within my Azure account I have created a new Namespace called Electricity and created 3 different queues:

  • 1111
  • 2222
  • 3333

image

.Net Retailer Clients

Similar to some of my other recent posts we are going to use the .Net Brokered Message API from client applications that will interact with BizTalk through the Service Bus.

Within our .Net Solution there are 3 projects:

  • DataContracts -  where we will find our message specifications for the SRR, SRN and SRO message types.
  • Retailer1111– where we will find our New Retailer  functionality.  This project will Send the SRR and receive the SRN response.
  • Retailer2222 – where we will find our Old Retailer functionality.  This project will Receive the SRO confirmation.

image

DataContracts

The first class that we want to create represents the Switch Retailer Request (SRR).  Within this message we have properties for SiteID (Customer identifier), New Retailer ID, Old Retailer ID and the Enrollment Date (effective date).

Normally the New Retailer would not necessarily be aware of the Old Retailer ID but since I am leaving the ERP functionality out of the scope of this blog post we will assume that the New Retailer is aware of this information.

namespace DataContracts
{
    public class SwitchRetailerReqeust
    {
        public string SiteID {get;set;}
        public string NewRetailerID {get;set;}
        public string OldRetailerID { get; set; }
        public DateTime EnrollmentDate { get; set; }
    }
}


Next we will get into the Switch Retailer Notification (SRN).  This is the message that BizTalk will send to the New Retailer confirming that the customer is now theirs.

namespace DataContracts
{
    public class SwitchNewRetailerNotification
    {
        public string SiteID { get; set; }
        public string NewRetailerID { get; set; }
        public DateTime EnrollmentDate { get; set; }
     
    }
}


Finally, we have the Switch Retailer Notification (SRO) that needs to be sent to the Old Retailer letting them know that this customer is no longer theirs.

namespace DataContracts
{
    public class SwitchOldRetailerNotification
    {
        public string SiteID { get; set; }
        public string OldRetailerID { get; set; }
        public DateTime EnrollmentDate { get; set; }
    }
}


Retailer1111 Project

As previously stated, the purpose of this project is to send the SRR transaction to the Distribution company and then receive the corresponding SRN transaction back.

using System.Text;
using System.Threading.Tasks;
using Microsoft.ServiceBus;
using Microsoft.ServiceBus.Messaging;
using DataContracts;
using System.Runtime.Serialization;
using System.IO;

namespace RetailerNew
{
    class Retailer1111
    {
   

            const string SendQueueName = "3333";
            const string ReceiveQueueName = "1111";
            const string ServiceNamespace = "<your_namespace>";
            const  string IssuerName ="owner";
            const string IssuerKey = "<your_key>”;

        static void Main(string[] args)
        {
            //***************************************************************************************************
            //                                   Get Credentials
            //***************************************************************************************************          
            TokenProvider credentials = TokenProvider.CreateSharedSecretTokenProvider  (Retailer1111.IssuerName, Retailer1111.IssuerKey);
            Uri serviceUri = ServiceBusEnvironment.CreateServiceUri("sb", Retailer1111.ServiceNamespace, string.Empty);

            MessagingFactory factory = null;

            try
            {
                //***************************************************************************************************
                //                                   Management Operations
                //***************************************************************************************************          
                NamespaceManager namespaceClient = new NamespaceManager(serviceUri, credentials);
                if (namespaceClient == null)
                {
                    Console.WriteLine("\nUnexpected Error: NamespaceManager is NULL");
                    return;
                }

                Console.WriteLine("\nChecking to see if Queue '{0}' exists...", Retailer1111.SendQueueName);

                // If Queue doesn't exist, then let's create it
                if (!namespaceClient.QueueExists(Retailer1111.SendQueueName))
                {
                    QueueDescription qd = new QueueDescription(Retailer1111.SendQueueName);
                   

                    namespaceClient.CreateQueue(qd);
                  
                }

                //***************************************************************************************************
                //                                   Runtime Operations
                //***************************************************************************************************
                factory = MessagingFactory.Create(serviceUri, credentials);

                QueueClient myQueueClient = factory.CreateQueueClient(Retailer1111.SendQueueName);

                //***************************************************************************************************
                //                                   Sending messages to a Queue
                //***************************************************************************************************
               

                Console.WriteLine("\nSending messages to Queue...");

                //Create a Switch Retailer Request
                SwitchRetailerRequest srr = new SwitchRetailerRequest();
                srr.SiteID = "3333123456789";
                srr.NewRetailerID = "1111";
                srr.OldRetailerID = "2222";
                srr.EnrollmentDate = DateTime.Now.AddDays(1);
          

     //Serialize the request so that BizTalk can process it correctly

                BrokeredMessage message = new BrokeredMessage(srr, new DataContractSerializer(typeof(SwitchRetailerRequest)));


                //Here we specify which URI we are expecting our response
                message.ReplyTo = serviceUri.AbsoluteUri + Retailer1111.ReceiveQueueName;
                 myQueueClient.Send(message);


                 //**************************************************************************************************
                 //                                   Receive messages from Queue
                 //**************************************************************************************************

                TokenProvider tokenProvider = TokenProvider.CreateSharedSecretTokenProvider(
                    Retailer1111.IssuerName, Retailer1111.IssuerKey);
                Uri uri = ServiceBusEnvironment.CreateServiceUri("sb", Retailer1111.ServiceNamespace, string.Empty);
                MessagingFactory messagingFactory = MessagingFactory.Create(uri, tokenProvider);
                QueueClient qc = messagingFactory.CreateQueueClient(Retailer1111.ReceiveQueueName, ReceiveMode.ReceiveAndDelete);
                BrokeredMessage bm;
                while ((bm = qc.Receive(new TimeSpan(hours: 0, minutes: 0, seconds: 30))) != null)
                {
                    var data = bm.GetBody<SwitchNewRetailerNotification>(new DataContractSerializer(typeof(SwitchNewRetailerNotification)));
                    Console.WriteLine(String.Format("Customer with SiteID {0} has now been enrolled as of {1}", data.SiteID, data.EnrollmentDate.ToString() ));
                }


                Console.WriteLine("\nAfter running the entire sample, press ENTER to clean up and exit.");
                Console.ReadLine();
            }
            catch (Exception e)
            {
                Console.WriteLine("Unexpected exception {0}", e.ToString());
                throw;
            }
            finally
            {
                // Closing factory close all entities created from the factory.
                if(factory != null)
                    factory.Close();
            }
           
        }

    }

}


Probably the most interesting/significant line of code in there is where we set the Brokered Message ReplyTo property.  The reason why this code is significant is that BizTalk can use the value of this property to set our URI that our Dynamic Send port is going to use in order to send the response back out.  You will see how this is set in the BizTalk section.

//Here we specify which URI we are expecting our response
message.ReplyTo = serviceUri.AbsoluteUri + Retailer1111.ReceiveQueueName;


Retailer2222 Project

The purpose of this project is to retrieve the SRO notifications that occur when we lose a customer to another retailer.

using System;
using System.Collections.Generic;
using System.Linq;
using System.Text;
using System.Threading.Tasks;
using Microsoft.ServiceBus;
using Microsoft.ServiceBus.Messaging;
using DataContracts;
using System.Runtime.Serialization;
using System.IO;

namespace RetailerOld
{
    class Retailer2222
    {

       
        const string ReceiveQueueName = "2222";
        const string ServiceNamespace = "<your_namespace>";
        const  string IssuerName ="owner";
        const string IssuerKey = "<your_key>";

        static void Main(string[] args)
        {

               try
               {

                //Create instance of tokenProvider using our credentials
                TokenProvider tokenProvider = TokenProvider.CreateSharedSecretTokenProvider(
                    Retailer2222.IssuerName, Retailer2222.IssuerKey);
                Uri uri = ServiceBusEnvironment.CreateServiceUri("sb", Retailer2222.ServiceNamespace, string.Empty);
                MessagingFactory messagingFactory = MessagingFactory.Create(uri, tokenProvider);
                QueueClient qc = messagingFactory.CreateQueueClient(Retailer2222.ReceiveQueueName, ReceiveMode.ReceiveAndDelete);
                BrokeredMessage bm;


                //***************************************************************************************************
                //                                   Receive messages from Queue
                //***************************************************************************************************

                Console.WriteLine("About to connect to the Queue");
                while ((bm = qc.Receive(new TimeSpan(hours: 0, minutes: 0, seconds: 30))) != null)
                {
                    var data = bm.GetBody<SwitchOldRetailerNotification>(new DataContractSerializer(typeof(SwitchOldRetailerNotification)));
                    Console.WriteLine(String.Format("Customer with SiteID {0} is no longer our customr as of {1}", data.SiteID, data.EnrollmentDate.ToString() ));
                }

                Console.WriteLine("\nAfter running the entire sample, press ENTER to clean up and exit.");
                Console.ReadLine();
            }
            catch (Exception e)
            {
                Console.WriteLine("Unexpected exception {0}", e.ToString());
                throw;
            }
       
        }
}
}


BizTalk Project

Within this solution I am going to demonstrate what is required to send messages to Service Bus Queues using a dynamic send port.  I am going to use two slightly different approaches so keep your eyes open for that.

Schemas

I have created 3 schemas to match those classes that were included in our DataContracts project.  In order to create these schemas, I did use the Auto Generate Schemas feature that is included in Visual Studio (when you have BizTalk installed of course).  I discussed this approach in a previous post if you are interested in more details.

image

Maps

I have two very simple maps, the first one will transform an instance of our SRR message to an instance of our SRN message.

image

The second map will transform an instance of our SRR message to an instance of our SRO message.

image

Orchestration

Here is where most of the “magic” happens.  We have a receive shape where we will receive an instance of our SRR message.  We will then transform it and set some context properties, within a Message Assignment shape, so that we can use a Dynamic Send Port.  What is special about this Message Assignment shape is that we are going to use a Brokered Message property called ReplyTo as our URI.  So this is a pretty need “out of the box” feature that allows a client to dictate where we need to send a response message.

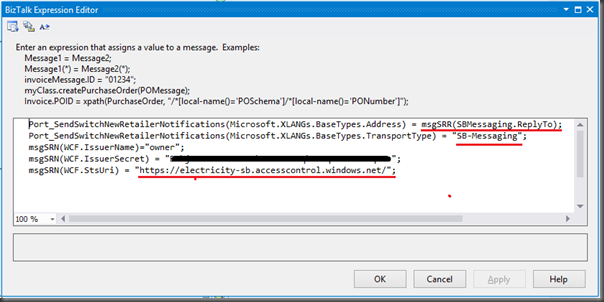
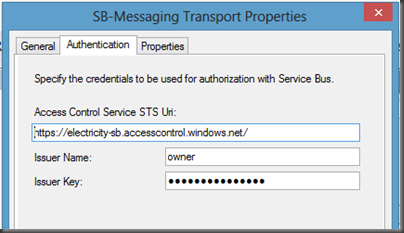
Even thought this ReplyTo property is beneficial, it only gets us part way.  We will need to provide a transport type and indicate that it is the new SB-Messaging adapter.  We also need to provide our Service Bus credentials and the URI to the Access Control Service.  It, of course, is a good idea to maintain these values in some sort of configuration store as opposed to hardcoding within our Orchestration.

image

Once we have sent out our SRN message back to the Service Bus Queue, we now need to process the SRO message.  We will once again leverage a map to instantiate this message in the absence of an ERP system were this message would ordinarily be created.  We will once again take advantage of Dynamic Send Ports but in this case we do not have the ReplyTo brokered message property because this retailer never sent us the message.  We will need to provide the base uri for the Service Bus but we can augment this by distinguishing the OldRetailerID node that is part of the SRO schema.  This will allow the solution to work for any retailer that needs to receive an SRO.

Much like the previous scenario we will need to specify a TransportType, our credentials and our Access Control Service URI.

image

When we are done putting these building blocks together we should have something that resembles the following.  We can now deploy our BizTalk application.

image

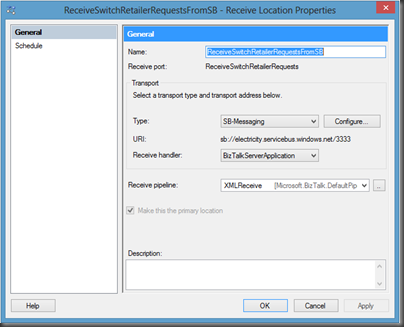
Receive Location

We will configure our Receive Location much like we did in my previous posts that discuss BizTalk integration with the Service Bus.

image

image

Send Ports 

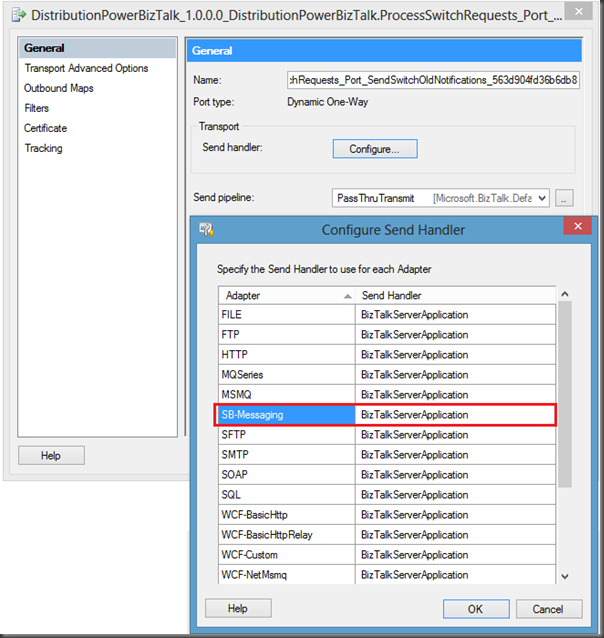
As outlined in the Orchestration section of this post, we have two different Send Ports.  Part of the reason why I have included two is to demonstrate the following NEW features that has been included in the BizTalk 2013 Beta.  In previous BizTalk versions, if you used a Dynamic Send Port then it would automatically use the Adapter’s Default Send Handler to send out the message.  This isn’t ideal, especially in a shared environment where there can be many different groups or applications using this same Send Handler(Host).

Going forward we now have a Configure button that we can click within a Dynamic Send Port’s configuration.  When we do this a Configure Send Handler dialogue will appear that allows us to set different Send Handlers depending upon the Adapter.

image

Even within our own Application we can set a different Send Handler if you have more than 1 Dynamic Send Port.  For our second Dynamic Send Port I have specified BizTalkServerApplication as the Send Handler for this Dynamic Send Port.

There is probably not a really good reason to do this but the point I am trying to make is that we have gone from being very restricted to having a lot of flexibility.

image

Testing

We are now ready to test our application.  The steps that we need to take in order to do so are:

  • Run an instance of our Retailer1111 client.  This application will send the SRR to the Service Bus Queue where BizTalk will retrieve it.
  • BizTalk in turn will look for the ReplyTo property and send an SRN message back to the ServiceBus but this time to the the Retailer’s 1111 queue.
  • Next, BizTalk will generate an SRO message and send it to the old Retailer’s 2222 queue.

image

Conclusion

The point of this blog post was to take a real world problem and discuss how the combination of Azure Service Bus Queues and BizTalk 2013 can help us solve it.  Of course I had to over-simplify things to make this blog post some-what reasonable in length.  This also is not the only approach that we can take in order to solve this problem.  Using Azure Service Bus Topics is another option as well but I thought it was important to demonstrate how we can use the SB-Messaging context properties and Dynamic Send Ports.  I also felt it was a great opportunity to highlight the new Send Port Configuration for Dynamic Send Ports.

Windows Azure 1.8 SDK– Queue to Queue Transfers

$
0
0

I was recently watching an episode of the Cloud Cover show where Abhishek Lal was talking about some of the recent features that are available in SDK 1.8.  One of the features that stood out for me was Queue to Queue transfers. A Queue to Queue transfer allows for a publisher to push content to a Queue.  Next, the Queue that just received the message can now push it out to another Queue automatically.

This new capability supports a couple design patterns:

  • Fan In – Where you have multiple systems publishing messages and you want to reduce the receiving endpoint surface down to a smaller number.
  • Fan Out – Where you have a single source message that you want to disseminate to more parties

The focus of this post is the Fan In scenario.  The diagram below describes the messaging pattern that we would like to enforce.  In this case we have 4 publishers.  Let’s pretend these are retailers who are now requesting more supply of a particular product.  If we want isolation between publishers then we would create a queue for each Publisher.  However, if we are interested in order delivery we now have race conditions that exist on the Receiver side.  Since this is a BizTalk Blog, BizTalk is acting as my Receiver.  Since we have 4 queues with 4 unique URIs this translates into 4 BizTalk Receive Locations (the blue RL boxes below).  We do not have any control over when and how those messages are received.  In my opinion this problem gets worse if we are building our own .Net client that is checking each queue looking for new messages.  Even if we are trying to be “fair” about the way in which we check the queues for new messages we don’t have any assurances of in order delivery.

image

Let’s make our lives easier and let the Service Bus maintain the order of messages through Queue to Queue  transfers and have a single endpoint that we need to consume from.  It will also simplify our BizTalk configuration as we will only need 1 Receive Location.

image


Solution

Within Visual Studio I am going to create a Solution that has 3 C# console applications.

image

QueueToQueuePublisher Project

The core of the overall solution is the QueueToQueuePublisher project.  Within it there are two classes:

  • DataContracts.cs -  contains our class that we will use as our PurchaseOrder
  • Program.cs -  is where we will create our Queues and establish our Queue to Queue forwarding.

image

DataContracts Class

If we further examine the DataContracts class we will discover the following object:

namespace QueueToQueuePublisher
{
    public class PurchaseOrder
    {
        public string ProductID { get; set; }
        public int QuantityRequired { get; set; }
        public string CompanyID { get; set; }
    }
}


Program Class

In Program.cs things get a little more interesting


using System;
using System.Collections.Generic;
using Microsoft.ServiceBus;
using Microsoft.ServiceBus.Messaging;

namespace QueueToQueuePublisher
{
    public class Program
    {
        const string CommonQueueName = "CommonQueue";
        const string PubAQueueName = "PubAQueue";
        const string PubBQueueName = "PubBQueue";
        const string ServiceNamespace = "<your_namespace>";
        const string IssuerName = "owner";
        const string IssuerKey ="<your_key>";

        static void Main(string[] args)
        {

            TokenProvider credentials = TokenProvider.CreateSharedSecretTokenProvider(Program.IssuerName, Program.IssuerKey);
            Uri serviceUri = ServiceBusEnvironment.CreateServiceUri("sb", Program.ServiceNamespace, string.Empty);

            try
            {
                //*************************************************************************************************
                //                                   Management Operations
                //**************************************************************************************************         
                NamespaceManager namespaceClient = new NamespaceManager(serviceUri, credentials);
                if (namespaceClient == null)
                {
                    Console.WriteLine("\nUnexpected Error: NamespaceManager is NULL");
                    return;
                }

                Console.WriteLine("\nCreating Queue '{0}'...", Program.CommonQueueName);

                // Create Queue if it doesn't exist.
                //This Queue must exist prior to another
                //Queue forwarding messages to it
                if (!namespaceClient.QueueExists(Program.CommonQueueName))
                {
                    namespaceClient.CreateQueue(Program.CommonQueueName);
                }

                // Create Publisher A's Queue if it doesn't exist
                if (!namespaceClient.QueueExists(Program.PubAQueueName))
                {
                    QueueDescription qd = new QueueDescription(Program.PubAQueueName);

                    //This is where we establish our forwarding
                    qd.ForwardTo = Program.CommonQueueName;
                    namespaceClient.CreateQueue(qd);
                }

                // Create Publisher B's Queue if it doesn't exist
                if (!namespaceClient.QueueExists(Program.PubBQueueName))
                {
                     QueueDescription qd = new QueueDescription(Program.PubBQueueName);
                    {
                         //This is where we establish our forwarding

                         qd.ForwardTo = Program.CommonQueueName;
                         namespaceClient.CreateQueue(qd);
                    };
                  
                }

            }
            catch (Exception ex)
            {
                Console.WriteLine(ex.ToString());
            }
        }
    }
}


Within this class, the purpose is to:

  1. Create the Common Queue, if it does not already exist.
  2. If Publisher A’s Queue does not exist, create a new Queue Description and include the ForwardTo directive that will forward messages from the Publisher A Queue to the Common Queue. We will then use this Queue Description to create the Publisher A Queue.
  3. If Publisher B’s Queue does not exist, create a new Queue Description and include the ForwardTo directive that will forward messages from the Publisher B Queue to the Common Queue. We will then use this Queue Description to create the Publisher B Queue.

The Program.cs class that is part of this project only needs to run once in order to setup and configure our queues.


Publisher A Project

The purpose of this Project is very simple.  We want to create an instance of a Purchase Order and publish this message to our Publisher A Queue.

using System;
using System.Collections.Generic;
using System.Linq;
using System.Text;
using System.Threading.Tasks;
using Microsoft.ServiceBus;
using Microsoft.ServiceBus.Messaging;
using QueueToQueuePublisher;
using System.Runtime.Serialization;


namespace PublisherA
{
    class Program
    {

            const string SendQueueName = "pubaqueue";
            const string ServiceNamespace = "<your_namespace>";
            const string IssuerName ="owner";
            const string IssuerKey = "<your_key>";
      
               
       static void Main(string[] args)
        {


            //***************************************************************************************************
            //                                   Get Credentials
            //***************************************************************************************************          
            TokenProvider credentials = TokenProvider.CreateSharedSecretTokenProvider  (Program.IssuerName, Program.IssuerKey);
            Uri serviceUri = ServiceBusEnvironment.CreateServiceUri("sb", Program.ServiceNamespace, string.Empty);

            MessagingFactory factory = null;

            try
            {
                PurchaseOrder po = new PurchaseOrder();

                po.CompanyID = "PublisherA";
                po.ProductID = "A1234";
                po.QuantityRequired = 300;

                factory = MessagingFactory.Create(serviceUri, credentials);

                QueueClient myQueueClient = factory.CreateQueueClient(Program.SendQueueName);

                BrokeredMessage message = new BrokeredMessage(po, new DataContractSerializer(typeof(PurchaseOrder)));
                Console.WriteLine("Publisher A sending message");
                myQueueClient.Send(message);


            }
            catch(Exception ex)
            {
                Console.WriteLine(ex.ToString());
            }

        }
    }
}

Publisher B Project

This project is pretty much a carbon copy of the Publisher A Project with the difference being that we are going to send messages to our Publisher B Queue instead of the Publisher A Queue.  I have included this project for completeness.


using System;
using System.Collections.Generic;
using System.Linq;
using System.Text;
using System.Threading.Tasks;
using Microsoft.ServiceBus;
using Microsoft.ServiceBus.Messaging;
using QueueToQueuePublisher;
using System.Runtime.Serialization;


namespace PublisherA
{
    class Program
    {

        const string SendQueueName = "pubbqueue";
        const string ServiceNamespace = "<your_namespace>";
        const string IssuerName = "owner";
        const string IssuerKey = "<your_key>";


        static void Main(string[] args)
        {


            //***************************************************************************************************
            //                                   Get Credentials
            //***************************************************************************************************          
            TokenProvider credentials = TokenProvider.CreateSharedSecretTokenProvider(Program.IssuerName, Program.IssuerKey);
            Uri serviceUri = ServiceBusEnvironment.CreateServiceUri("sb", Program.ServiceNamespace, string.Empty);

            MessagingFactory factory = null;

            try
            {
                PurchaseOrder po = new PurchaseOrder();

                po.CompanyID = "PublisherB";
                po.ProductID = "B1234";
                po.QuantityRequired = 300;

                factory = MessagingFactory.Create(serviceUri, credentials);

                QueueClient myQueueClient = factory.CreateQueueClient(Program.SendQueueName);


                BrokeredMessage message = new BrokeredMessage(po, new DataContractSerializer(typeof(PurchaseOrder)));
                Console.WriteLine("Publisher B sending message");
                myQueueClient.Send(message);


            }
            catch (Exception ex)
            {
                Console.WriteLine(ex.ToString());
            }

        }
    }
}

BizTalk

From a BizTalk perspective we are going to keep this very simple.  We will simply create a Send Port Subscription and write a copy of any message that is retrieved from the Common Service Bus Queue to disk.

In order to configure a Send Port Subscription we need to first create a Receive Port and Receive Location.  This Receive Location will connect to our ServiceBus Namespace and will be looking for messages form the CommonQueue only.  As you may recall the messages that are sent to the individual Publisher A and B Queues will be forwarded to this Common Queue. 

Also note, since I am not deploying any Schemas we want to use the PassThruReceive pipeline.  If you specify XMLReceive then BizTalk will be looking for a schema that doesn’t exist.

image

Our Send Port will consist of using the FILE Adapter to write our messages to the local file system.

image

In order for our Send Port Subscription to work we do need to create a Filter based upon our Receive Port Name.

image

At this point we can enable our BizTalk Application.


Testing

In order to test our application we do need to make sure that the QueueToQueuePublisher console application is run.  This will create our common queue and our two publisher queues.  After running this application we should see the following within our namespace.

image

If we want to test our Queue To Queue forwarding we can simply create a test message in our pubaqueue and then receive the test message from our commonqueue.

image

image

image

Now that our Queue configuration has been verified we can run an instance of our PublisherA console application.

image

If we check our file folder that our send port is writing to we should see a new file has been written.

image

We can now perform the same actions with PublisherB.

image

image

Conclusion

As you can see the Queue to Queue forwarding is a pretty neat feature.  We can use it for Fan In, as in our scenario, messaging scenarios that forces Service Bus to worry about in order delivery and simplifies a Receiver’s endpoint surface.  Arguably it creates more configuration in the cloud so there may be a bit of a trade off in that regard.

Currently the only way to configure the ForwardTo property is through the Management APIs.  There is currently no GUI that allows you to take care of this.  But, without having any private knowledge, I am sure that this is something that Microsoft will address in a future update.

Something else to be aware of is that BizTalk has no understanding of ForwardTo.  Nor would any other client of the Service Bus.  This “configuration” is occurring outside of client configurations which is the way it should be.  Any perceived complexities that exist should be abstracted away from systems that are communicating with Service Bus.

WCF-SAP User account not in validity date

$
0
0

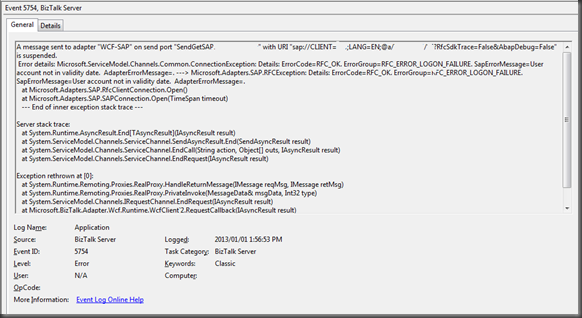
Recently, I have been working with a new organization and have been been building some interfaces that communicate with SAP. Over the Christmas break I continued to work on some of these interfaces.  On December 31 my interfaces were working just fine.  But, on January 1st, I made a few changes and then ran my BizUnit regression tests just to make sure everything was ok.  To my surprise, my tests were failing and the issue was related to the following error.

SAPError

It just seemed like too much of a co-incidence that the errors started occurring on the first day of the new year. My gut told me that my account must have expired. At my previous organization the SAP-BizTalk system accounts never expired but they do at this one(which is probably not a bad thing).  The resolution in this case was for the SAP Basis team to update the validity date for the account.  Once this attribute was updated I could re-connect to SAP through my interfaces.  I have no idea why the SAP error message doesn’t just say “your account has expired”.

MSDTC Adventures: 'System.EnterpriseServices.TransactionProxyException'

$
0
0

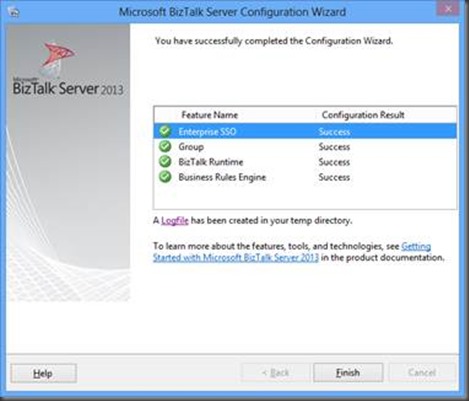
I was configuring a new Development environment that consisted of a BizTalk Application Server and a Remote SQL Server.  The BizTalk Installation went smoothly but the Configuration did not.  I tend to configure SSO service on its own as it can be problematic. There is no point in configuring the remaining databases until a person knows that the SSO database is created successfully.  Otherwise, there will be a lot of wasted key strokes.

In this particular case I was able to configure the SSODB but as soon as I would try to configure the Group and Runtime, the System.EnterpriseServices.Transaction Proxy exception started to surface.

If you perform a Google/Bing search for 'System.EnterpriseServices.TransactionProxyException' you will probably get quite a few results.  Most of the results will point you in the direction of a MSDTC not being enabled or configured correctly.

In my case MSDTC was configured correctly based upon Microsoft’s recommendations. I was a little puzzled at this point but in some of the support forums people were discussing the DTC Tester tool.  Having been through a lot of frustration and a few failed attempts at trying to configure the Group and Runtime features I figured I would give it a try.  I am glad I did.

The purpose of DTC Tester is to enlist a remote transaction against the Temp Database which is hosted in SQL Server.  If you are able to successfully enlist and commit this transaction then there is a very high probability that your BizTalk configuration (as it relates to MSDTC) will be successful.

The tool is available here.  Download it and run the self extracting executable.  At this point we will discover a ‘dtctester’ executable and an End User License Agreement.

image

The dtctester executable needs to be run from a command prompt but requires an ODBC connection is configured before we can run the tool.  The ODBC connection should be pointed at the Database Instance where we want our BizTalk Databases to be created.

ODBC connections can be created via the Control Panel and a System DSN will work.

image

From a command prompt we can now run the tool.  When I ran it for the first time I encountered errors (highlighted in red)


C:\Downloads>dtctester <ODBCConnectionName> <UserName> <Password>
Executed: dtctester
DSN:  <ODBCConnectionName>
User Name: <UserName>
Password: <Password>
tablename= #dtc7063
Creating Temp Table for Testing: #dtc7063
Warning: No Columns in Result Set From Executing: 'create table #dtc7063 (ival int)'
Initializing DTC
Beginning DTC Transaction
Enlisting Connection in Transaction
Error:
SQLSTATE=25S12,Native error=-2147168242,msg='[Microsoft][ODBC SQL Server Driver]
Distributed transaction error'
Error:
SQLSTATE=24000,Native error=0,msg=[Microsoft][ODBC SQL Server Driver]Invalid cur
sor state
Typical Errors in DTC Output When
a.  Firewall Has Ports Closed
-OR-
b.  Bad WINS/DNS entries
-OR-
c.  Misconfigured network
-OR-
d.  Misconfigured SQL Server machine that has multiple netcards.

Aborting DTC Transaction
Releasing DTC Interface Pointers
Successfully Released pTransaction Pointer.

In my situation the issue ended up being the Windows Firewall on the BizTalk Server was not allowing Outbound DTC connections which was blocking MSDTC from participating in Transactions with SQL Server.  You can modify the MSDTC Firewall rules in the Control Panel.

After allowing MSDTC to communicate through the firewall I re-ran the dtctester tool and had success.

C:\Downloads>dtctester <ODBCConnectionName> <UserName> <Password>
Executed: dtctester
DSN:  <ODBCConnectionName>
User Name: <UserName>
Password: <Password>
tablename= #dtc9418
Creating Temp Table for Testing: #dtc9418
Warning: No Columns in Result Set From Executing: 'create table #dtc9418 (ival int)'
Initializing DTC
Beginning DTC Transaction
Enlisting Connection in Transaction
Executing SQL Statement in DTC Transaction
Inserting into Temp...insert into #dtc9418 values (1)
Warning: No Columns in Result Set From Executing: 'insert into #dtc9418 values (
1) '
Verifying Insert into Temp...select * from #dtc9418 (should be 1): 1
Press enter to commit transaction.

Commiting DTC Transaction
Releasing DTC Interface Pointers
Successfully Released pTransaction Pointer.

Disconnecting from Database and Cleaning up Handles

After completing this successful test with the dtctester tool I could successfully configure my BizTalk Group and Runtime.

clip_image001


Service Bus Notification Hubs – Part 1

$
0
0


This past week the Service Bus team at Microsoft rolled out a preview of their latest offering called Service Bus Notification Hubs.  For those of those of you who keep an eye open for all things Middleware from Microsoft, you may recognize the code name of the project: Iguazu.  You may  have even seen Iguazu presented by Clemens Vasters at one of the recent Microsoft conferences/summits.

What are Service Bus Notification Hubs?

So what are Service Bus Notification Hubs?  Probably the simplest way to explain it is an internet-scale Push Notification Service.  Push Notifications are nothing new.  The major mobile platforms all have them and you have inevitably used them if you use social media apps like Facebook, Twitter or even games.  These notifications are often called “Toast Notifications” in the sense that they pop up and inform you of some relevant event such as someone commenting on a post of yours or informing you that you have been mentioned on Twitter.

If they have been around for a while, why do I care about them now?

Just because Notification Services from Apple, Google and Microsoft have been around for a long time, doesn’t mean that it has been easy to use them.  Often times developers need to manage all of the subscriptions and channels within their own data stores. Developers were also required to deal with the nuances of the  different platforms and managing which subscriptions were running on a particular platform.  This results in a lot of fragmentation.  Finally, dealing with large scale has also been challenging for some organizations.  Imagine if you were a large media outlet with hundreds of thousands or millions of users.  Providing timely notifications to users of this magnitude becomes extremely important.  For example receiving a notification for a touchdown that happened in the 2nd Quarter when the game is already over is not a good user experience. Service Bus Notification Hubs can take care of this by delivering to a wide audience immediately.

Benefits of using Service Bus Notification Hubs

While I am relatively new to this technical domain(mobile notifications), I found building solutions off of Service Bus Notification Hubs was pretty straight forward.  I find it very compelling that I can choose to use Native Notifications that are specific to a respective platform or I can just use one of the many generic templates that ship and can address devices on multiple platforms.  Since the service is currently in “preview mode”, only Windows 8 and IOS notifications are supported but Microsoft is targeting Android and Windows Phone when the service becomes Generally Available.  Another key benefit, and perhaps this is why it is in the Service Bus family, is the service is true Pub-Sub.  I don’t have to worry about specific subscriptions.  I just have to throw the message at the Service Bus and let it figure out who is interested in it.  It could be 1 person/device or it could be 100 000.  It doesn’t matter to my Server code.  This features alone makes the service worth it.

What’s next?

There is quite a bit of content that is already available for this topic and I recommend checking out the following links:

Also stay tuned to this blog where I will be walking through a corporate scenario from the Energy sector where I will combine Service Bus Notification Hubs, BizTalk and Windows 8 Store Apps.

Service Bus Notification Hubs–Part 2 Improving Customer Engagement

$
0
0


In my previous post I introduced Service Bus Notifications and explained why you may want to use it when sending Notifications to mobile devices.  In this post I want to explore its use in a corporate environment and how introducing this technology can improve customer engagement as well as employee engagement.

Use Case

Back in the Summer of 2012, I wrote a couple blog posts on BizTalk and SignalR.  The idea was that BizTalk could provide real time notifications to on premise users.  The notifications provided the current  state of particular events that were flowing through BizTalk. In this post there is a similar theme but this time we will extend the experience onto customers and mobile field workers.

The scenario that we are going dive into is a typical Customer Power Outage scenario.  We have all been there, we get home from work (or wherever) and discover that our power is out.  If you have never worked in the utility sector, you probably have no idea what goes on behind the scenes.  I have worked in the sector for close to 7 years and I can assure you that these scenarios are taken seriously.  At least the places that I have worked have treated them that way.

Each utility will vary greatly when it comes to dealing with Power Outage scenarios.  Some utilities will have very sophisticated SCADA and Outage Management Systems (OMS) others may simply rely upon customers calling their utility to notify them that their power is out.  Sometimes the power outage may be widespread other times it may be only you.  Much like any other company, or industry, the utility companies are looking for ways to provide Self Service capabilities to customers.  Just like you can check your bank account online, why can’t you see your power consumption or inform your power company that your power is off via a mobile application?

In the diagram below, you will see many different key data flows:

  • Notifying the OMS system of devices that have failed via SCADA interfaces
  • Customers calling and talking to a Contact Centre agent.  The Contact Centre agent in turn will leverage a Customer Information System (CIS) to log a ticket.
  • Customers who use an Integrated Voice Recognition (IVR) service when live agents are currently servicing other customers
  • Self Service inputs such as mobile applications and  Websites

If an organization is using a Middleware product, such as BizTalk to bridge all of these different inputs with the Outage Management System then BizTalk has access to a lot of relevant, event driven information.

Another interesting fact is when orders are created and dispatched to Field workers aka Power Line Technicians (PLTS) information is often passed back to an ERP system.  This information is often used for Financial or Reporting purposes.  For instance if there is a power outage, then resources will be used to address the power outage.  This will include Employee time and materials such as replacement parts and equipment used such as vehicles to fix the problem. This information is usually passed back once the outage has been completed or maybe as the outage is being resolved in the form of updates. Since ERP systems are usually not part of Outage Management Systems, this information needs to be moved via  Middleware platform such as BizTalk.

image

Hopefully it has become apparent that BizTalk has access to a lot of important event driven information that is passing through it that may be of interest to other parties such as customers.  For instance if your power was out, would you like to know when the Estimated Time to Restore (ETR) is?  Or if you were the owner of a small business, who relied upon power to run its business, would you like to be notified the minute the outage is over? I am pretty sure you would.  The interesting part is that any decent Outage Management System will have this information.  The problem is that utilities just do not have the people resources to start calling people to let them know. Here is where the opportunity lies to use Service Bus Notification Hubs.

The Solution

Enter Service Bus Notification Hubs.  I think this is a great complimentary technology to BizTalk.  In this case BizTalk is performing traditional On-Premise integration and can easily hook into a progressive service like Service Bus Notification Hubs to deliver better customer engagement with very little effort.

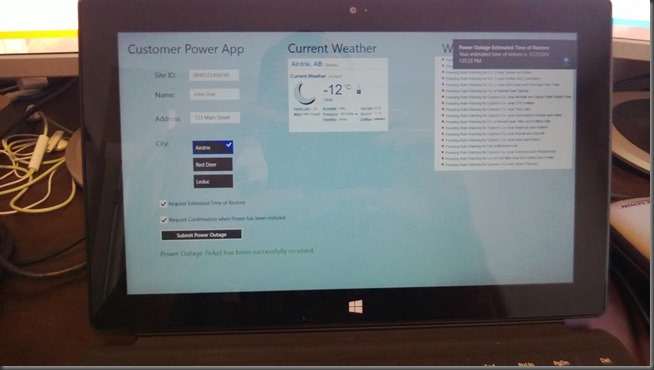
I have built out a fairly comprehensive solution that dives deeper into this problem.  I will be breaking down this problem into a series of different posts.  But, as a bit of a teaser you can see part of the solution in the screen shot below.


Toast

Service Bus Notification Hubs–Part 3 My Solution Overview

$
0
0

In my previous post I introduced the concept of Customer Power Outages and, at a high level, introduced  how Outage Management Systems work.  The key take away from that blog post is that important, event driven data is passing through BizTalk and there is an opportunity use this information to provide better Customer and Employee engagement through Service Bus Notification Hubs.  Think about, conceptually how different is it from BAM Alerts?  The idea behind BAM Alerts is data is moving through BizTalk, Tracking Profiles pick it up and send it to subscribers who are interested in it via email (oversimplified…I know).  The process of collecting this information for Notification Hubs is different but now we can reach an audience that we may never had access to before.

In this post we will take a closer look into how we could actually implement a Power Outage system and include notifications to both customers and employees by using Service Bus Notification Hubs. 

Note: In some areas I have over-simplified the process in order to focus on some of the key technical aspects of Notification Hubs.

In the diagram below I have laid out the series of events that make up the architecture:

  1. Customer determines their power is out and launches the Windows 8 application on their SurfaceRT tablet in order to report their Power Outage.  The mobile client registers itself for Toast Notifications.  In this case the Customer is only interested in events pertaining to its SiteID (Customer ID) so a Tag of 0090123456789 is included as part of the Toast Notification registration. Next, the customer clicks the submit button to notify the power company of their outage. The message is sent to a Customer Outage Service Bus Queue.
  2. BizTalk is using the new SB-Messaging Adapter to connect to this Service Bus Queue and pulls down the Customer message.
  3. BizTalk will perform a transformation and send the message to the Work Order Create Queue.  Once again, the new SB-Messaging Adapter will be used when communicating with the Service Bus.
  4. Once the Work Order message has been sent to the Service Bus Work Order Create Queue, BizTalk will send a message using the Service Bus .Net Preview SDK to the Service Bus Notification Hub.  Included in this message is the tag “Airdrie” which happens to be the City were the customer, who submitted the trouble ticket, lives.  It also happens to be the area that the Power Line Technician (PLT)  is responsible for.  Only he will receive this toast notification because he is the only employee that is registered for this tag. 
  5. The PLT will now receive a Toast Notification indicating that he has a new Work Order that he needs to complete.
  6. When the PLT clicks on the Toast Notification, the PLT App is launched and he can click the Retrieve Next Order button to download the order. 
  7. Once the PLT has had a chance to assess the situation he can provide an Estimated Time of Restore (ETR) and send this information to a Work Order Update Queue that exists in the Service Bus.
  8. BizTalk will pickup this message from the Work Order Update Queue.
  9. The updated Work Order information will now be sent to the Outage Management System using the FILE Adapter.
  10. BizTalk will use the information contained in the Work Order Update message to push a Notification message up to the Service Bus Notification Hub.  As part of this message, a tag for the customer’s Site ID is populated.  In this case it is 0090123456789 which happens to be the same Site ID as the customer who initially logged the Power Outage ticket.
  11. The customer will now receive a Toast Notification indicating their Estimated Time of Restore (ETR).
  12. Steps 7 – 11 will be repeated once the PLT has restored power and a notification can be sent to the customer, when the work order has been closed in the Outage Management System, indicating that their power has been restored and give them a duration of the outage.

image

Conclusion
Hopefully this post has described in more detail how Service Bus Notifications can improve customer and employee engagement.  I promise that the next post in the series will have some code.  I just felt that if I could build a story, it would provide some worthwhile context that truly demonstrates why this Notification Hub technology is important.

Service Bus Notification Hubs-Part 4 The Solution

$
0
0

It has been fun discovering Service Bus Notifications. I have received some good feedback over Twitter recently and have also shown my demo to some colleagues over the past week with some great responses.

In my last post we discussed the solution at a high level.  Within this post we are going focus on the actual implementation.  I will warn you in advance that this post will be fairly lengthy so buckle up.  If you find the walkthrough too long, be sure to check the video at the end of the post that will show this solution live in action.

I am going to break this post up into 5 Sections:

  1. Creating Service Bus Queues
  2. Creating Customer Power Outage Application
  3. Creating PLT Application
  4. Creating BizTalk Application
  5. Testing/Demo

Section 1: Creating Service Bus Queues

The area that we are going to focus on in this section is highlighted below in green.  In total we are going to create 3 Queues.

image

The 3 Queues are called:

  • customerqueue
  • createworkorder
  • updateworkorder

The Queues were created from the WindowsAzure.com portal using the default settings.

image


Section 2: Creating Customer Application

Moving on, we are going to focus on the Customer facing application.  In this case I am running the application on the SurfaceRT but you certainly do not require a SurfaceRT to run it.  In my case I just needed to ensure that my app is being compiled for ARM as opposed to x64.

I will also caution that I am by no means a Windows 8 store app expert.  So if you are looking for a fancy UI or UX you aren’t going to find it here.  I approaching this blog post from an integration perspective.

image

In order to build this sample you will need a Windows Store development account.  If you have an MSDN account you already have some entitlements so it won’t cost you extra.  Otherwise you can expect to pay some money(it may vary by country so I will just leave it there).

Let’s get started:

  • Open Visual Studio and create a new Windows Store Application.  We need to select Grid App (XAML) in this case.

image

  • If you open the GroupItemsPage.xaml you will discovera GridView that contains many repeating Items.  To simplify our app, we will just delete this markup and create something a little simpler.
  • Drag some text boxes and labels onto the design canvas.  Don’t worry about the Current Weather and Weather Warnings images.  Those are simply static images used to improve the user experience.  If you are following along, here are the actual names of the text fields, labels, checkboxes and button that were used:
    • txtSiteId
    • txtName
    • txtAddress
    • listCity
    • chkETR
    • chkConfirmPowerOn
    • btsSubmitOutage

image

  • With our GUI now set, lets double click on the btsSubmitOutage button to create a click event handler.  Within this handler we will have the following code:

private void btsSubmitOutage_Click(object sender, RoutedEventArgs e)
{
     txtStatus.Text = "";
     CustomerPowerOutage cust = new CustomerPowerOutage();
     cust.SiteID = txtSiteId.Text;
     cust.CustomerName = txtName.Text;
     cust.Address = txtAddress.Text;
    
     ListBoxItem selected =(ListBoxItem) listCity.SelectedItem;
     cust.City = selected.Content.ToString();

     bool requestETR = (bool) chkETR.IsChecked;
     bool requestPowerOnConfirmation = (bool) chkConfirmPowerOn.IsChecked;

     SendMessageToQueue(cust,requestETR,requestPowerOnConfirmation);
    
}

  • You may have noticed that there are a couple things missing: what is this CustomerPowerOutage object and where is the code listing for the SendMessageToQueue? 
  • The CustomerPowerOutage is just a class that we will use to capture/store this data from the form.  This object will get serialized so that it can be processed by BizTalk as an XML document.

namespace CustomerPowerOutageApp
{
    public class CustomerPowerOutage
    {
        public string SiteID { get; set; }
        public string CustomerName { get; set; }
        public string Address {get;set;}
        public string City { get; set; }
    }
}

  • The SendMessageToQueue method’s code is listed below.  This method is responsible for communicating with the customer queue that we created in the previous section.  A pre-requisite for this function is a library, or dll, that will allow us to communicate with Service Bus.  In this case we can’t use the typical Microsoft.ServiceBus.dll that is available in Nuget.  Instead we need to get the Service Bus WinRT Managed SDK which is available here.   In order to use this functionality provide the following reference: usingMicrosoft.WindowsAzure.Messaging;.
  • You will notice in this code that we are going to set some message properties.  We can think of these properties to be much like brokered messaging properties but since we are not explicitly using the BrokeredMessaging object I won’t call them that.  Another thing to note is that we are using the async model in this case which is different from some of the console app style samples that you may be use to.

private async void SendMessageToQueue(CustomerPowerOutage cust,bool requestETR, bool requestPowerOnConfirmation)
    {
       
        Message m = new Message(cust, new DataContractSerializer(typeof(CustomerPowerOutage)));
        m.Properties.Add("RequestETR", requestETR);
        m.Properties.Add("RequestPowerOnConfirmation", requestPowerOnConfirmation);
        await CustomerQueue.SendAsync(m);
        txtStatus.Text  = "Power Outage Ticket has been successfully received.";
    }

  • The next question is probably: I haven’t created a connection yet so how can I send this message?  Very true, this is something that we need to do and can be done in the constructor of this class:

private Queue CustomerQueue = null;
    public GroupedItemsPage()
    {
        this.InitializeComponent();
        CustomerQueue = new Queue("CustomerQueue", "Endpoint=sb://<your_namespace>.servicebus.windows.net/;SharedSecretIssuer=owner;SharedSecretValue=<your_key>");
   
    }

At this point we have built the GUI, created a contract that we can use to exchange data with BizTalk, and sent a message to Service Bus Queue.  What is missing though is that our Customer Power Outage Application will receive Service Bus Notifications (Toast Notifications). This is represented as step 11 in the Solution Overview images.  Since we are in this application, lets do this now.

  • Right click on our project and select Store –> Associate with App Store…
  • Sign In with your app store credentials
  • Click the Reserve Name link

image

  • Give your App a unique name

image

  • Provide a unique name.  Theoretically, your app could end up in the App Store so this is why you need a unique name and can’t use the name that has been used in this blog post.

image

  • Click Save  to reserve this app name.

image

  • Next we want to click on the Advanced features link.  This is where we are going to enroll our application to support receiving push notifications.
image
  • Click on the Push notifications and Live Connect services info link

image

  • Click on the Authenticating your service link

image

  • Make a note of both the Package Security Identifier (SID) and Client secret. We will need both of these values when we create our Service Bus Notification Hub in the Windows Azure portal.

image

  • Now we do need to move over to the WindowsAzure.com portal where we will create our Notification Hub.  Log into the portal, select Service Bus, then the namespace that you want to use, followed by click on Notification Hubs.

image

  • Click the New button and then App Services –>Service Bus Notification Hub –> Quick Create and then provide a unique Notification Hub Name.

image

  • We now need to double click on our newly created Hub Notification and then click on the Configure link.

image

  • We now want to provide the Package SID and Client Secret that we previously generated.  If we have a an Apple Certificate thumbprint we could put it here but Apple is out of scope for this blog post.

image

  • In order receive Toast Notifications, we need to enable our application to accept them.  In order allow this we need to double click on the Package.appxmanifest file and then set Toast capable to Yes.

image

At this point we have finished our configuration for Service Bus Notification Hubs.  We now need to wire up some code within our application in order to take advantage of this configuration.

  • In our App.xaml.cs file we need to include the following references.

using Microsoft.WindowsAzure.Messaging;
using System.Threading.Tasks;
using Windows.Data.Xml.Dom;
using Windows.UI.Notifications;

  • Next we want to create a class level variable called notificationHub.

NotificationHub notificationHub;

  • Within our class constructor we need to provide our connection details.

     /// <summary>
     /// Initializes the singleton Application object.  This is the first line of authored code
     /// executed, and as such is the logical equivalent of main() or WinMain().
     /// </summary>
     public App()
     {
         var cn =
         ConnectionString.CreateUsingSharedAccessSecretWithListenAccess(
         "sb://<your_namespace>.servicebus.windows.net/ ",
         "<your_NotificationHubCredentials>);
         notificationHub = new NotificationHub("PowerOutageNotificationhub", cn);

         this.InitializeComponent();
         this.Suspending += OnSuspending;
     }

  • Note: the Notification Hub Credentials are different than your typical Service Bus credentials.  New credential “modes” have been introduced as part of Notification Hubs.  There are credentials that allow Listen access and credentials that allow for Full access (Publish and Read). To access these credentials go into the Notification Hub portion of the Windows Azure Portal and click on the View SAS Key label.

image

  • In this particular case we want the key that provides Listen rights.  In the BizTalk code later we will use the key that possesses Listen, Manage, Send rights.

image

  • Within the OnLaunched method we want to initialize our Notification registration.

protected override async void OnLaunched(LaunchActivatedEventArgs args)
        {

            await InitializeNotificationsAsync();

……

  • We also want to initialize our Notification registration within the OnActivated method.

protected async override void OnActivated(IActivatedEventArgs args)
     {
         base.OnActivated(args);
         await InitializeNotificationsAsync();
     }

  • Next we need to actually create the InitializeNotificationAsync method.  Within this method we are going to check to see if our registration exists, if it does not we are going to create it.  If we do need to create it then there are a few things that we need to provide in the CreateTemplateRegistrationForApplicationAsync call. The first is the Toast Template that we want to call.  In this case we will use a helper method which will be described shortly.  Next, we need to provide a name for this registration.  Finally we are going to create what is called a Tag. A Tag is basically criteria that we would like to subscribe on.  In this case we will only create one, but it does accept an array of strings if we wanted more.  The value that is being specified here is the customer’s SiteID.  If you go back to the previous GUI screen you should see this value is populated.  In a production system, I would envision a customer going through an enrollment process where they would provide their SiteID.  Then from this method we would simply load it from a configuration store.  This is very important to our scenario though.  When the PLT updates a work order, this SiteID is actually pushed up to the Service Bus Notification Hub and that is how this client will receive a Toast Notification since we are looking for Tags that contain this value.

    async Task InitializeNotificationsAsync()
       {
           await notificationHub.RefreshRegistrationsAsync();

           if (!await notificationHub.RegistrationExistsForApplicationAsync(
                                                            "PowerOutageAppToastReg"))
           {

           await notificationHub.CreateTemplateRegistrationForApplicationAsync(
               BuildTextToastTemplate(), "PowerOutageAppToastReg", new string[] {"0090123456789"});   //Our Customer Site ID
                                                                              
       }
   }

  • Toast Templates are a very important part of the user experience for Service Bus Notifications.  For the purpose of this blog post I am going to keep things short but I suggest checking out this video by Clemens Vasters who can provide this topic more justice.  For the purpose of this blog post we will use the ToastTemplateType.ToastText02 template.  This will allow us to to pass two “parameters” that can be used in our Toast Notification. 


XmlDocument BuildTextToastTemplate()
{
     var template =
         ToastNotificationManager.GetTemplateContent(ToastTemplateType.ToastText02);
     var textNode = template.SelectSingleNode("//text[@id='1']") as XmlElement;
     if (textNode != null)
     {
         textNode.InnerText = "$(msg)";
     }

     var textNode2 = template.SelectSingleNode("//text[@id='2']") as XmlElement;
     if (textNode2 != null)
     {
         textNode2.InnerText = "$(msg2)";
     }

     return template;
}

  • At this point we are done with our Customer Power Outage application.  If we want to perform an initial test we can run our application and submit a message to our Service Bus Queue to ensure it works properly.  To submit a message we simply click Create Power Outage.

image

  • If we navigate to our Windows Azure portal we should see that our CustomerQueueQueue Length Property has a value of 1

image

Section 3: Creating PLT Application

Note: There are aspects of this application that are very similar to the Customer Power Outage scenario so those parts will not be duplicated.  I will try to do a good job of communicating when this happens.

The purpose of this application is that we will have a Power Line Technician (PLT) that will receive a notification indicating that he/she has work to do.  When the PLT is in their application, they will be able to retrieve their order from the Service Bus queue.  As they update the order or close it the information will be sent back to the Service Bus and subsequent Notifications will be sent to the Customer who logged the Power Outage.

image

  • Once again we need to create a Windows Store Application.  We also need to select Grid App (XAML) the project type.
  • Once again I recommend creating your GUI first.  In this case we want to create the following controls:
    • txtSiteID
    • txtName
    • txtAddress
    • txtCity
    • btnRetrieveNextOrder
    • lblETR (hidden)
    • lblETR2 (hidden)
    • txtETR (hidden)
    • btnUpdateETR (hidden)
    • lblPowerRestored (hidden)
    • txtPowerRestored (hidden)
    • lblETR2_Copy (hidden)
    • btnCloseOrder (hidden)
    • txtStatus (hidden)
    • imgMap (hidden – added for effect)

image

  • If we double click on the btnRetrieveNextOrder button, an event handler will be created. Within this event handler we are simply going to call a method called ReceiveMessageFromQueue that will pull a message off of the CreateWorkOrder Queue

    private void btnRetrieveNextOrder_Click(object sender, RoutedEventArgs e)
      {

          ReceiveMessageFromQueue();
      }

  • Within the ReceiveMessageFromQueue method we are going to retrieve a message off of the Queue.  We are going to use a Data Contract Serializer so that we can use a typed message to populate the various text controls that exist on the screen.

private async void ReceiveMessageFromQueue()
{

    var message = await cwo.ReceiveAsync<Message>(new System.TimeSpan(0,0,5));

    var data = message.GetBody<UpdateOrder>(new DataContractSerializer(typeof(UpdateOrder)));

    txtAddress.Text = data.Address;
    txtSiteID.Text = data.SiteID;
    txtName.Text = data.CustomerName;
    txtCity.Text = data.City;


    //Retrieve the BrokeredMessaging Properties so that we can later be used by BizTalk to determine whether or not Notifications should be send

    isETRRequired =(bool) message.Properties["RequestETR"];
    isPowerRestoreRequired = (bool) message.Properties["RequestPowerOnConfirmation"];

    //display controls
    lblETR.Visibility = Windows.UI.Xaml.Visibility.Visible;
    lblETR2.Visibility = Windows.UI.Xaml.Visibility.Visible;
    txtETR.Visibility = Windows.UI.Xaml.Visibility.Visible;
    btnUpdateETR.Visibility = Windows.UI.Xaml.Visibility.Visible;

    lblPowerRestored.Visibility = Windows.UI.Xaml.Visibility.Visible;
    txtPowerRestored.Visibility = Windows.UI.Xaml.Visibility.Visible;
    lblETR2_Copy.Visibility = Windows.UI.Xaml.Visibility.Visible;
    btnCloseOrder.Visibility = Windows.UI.Xaml.Visibility.Visible;
    imgMap.Visibility = Windows.UI.Xaml.Visibility.Visible;
    txtStatus.Visibility = Windows.UI.Xaml.Visibility.Collapsed;
     
}

  • Below is the UpdateOrder type that is used to represent a Trouble Order that has been received from a Customer.

namespace PowerLineTechnicianApp
{
   public class UpdateOrder
    {
        public string SiteID { get; set; }
        public string CustomerName { get; set; }
        public string Address { get; set; }
        public string City { get; set; }
        public double ETR { get; set; }
        public double PowerOutDuration { get; set; }
        public string OrderAction { get; set; }
        public bool NotifyETR { get; set; }
        public bool NotifyPowerRestored { get; set; }
    }
}


  • When the btnRetrieveNextOrder is pressed and subsequently the order is downloaded.  Some additional controls will be added to the screen.  This includes two buttons that allow us to update the Trouble Order.  The point of the update is to notify the Outage Management System, via BizTalk, of the update.  What we will soon discover is that while this is happening that We can also send messages from BizTalk to a Service Bus Notification Hub.  More on this later.

image

  • In order to update an order we need to wire an Event Handler for the  btnUpdateETR button.  Within here we will populate the UpdateOrder message and send it to the UpdateWorkOrder Service Bus Queue.

private void btnUpdateETR_Click(object sender, RoutedEventArgs e)
  {

      UpdateOrder uo = new UpdateOrder();

      uo.Address = txtAddress.Text;
      uo.City= txtCity.Text;
      uo.CustomerName = txtName.Text;
      uo.SiteID = txtSiteID.Text;
      uo.OrderAction = "UPDATE";
      uo.ETR = System.Convert.ToDouble(txtETR.Text);
      uo.NotifyETR = isETRRequired;
      uo.NotifyPowerRestored = isPowerRestoreRequired;

      SendMessageToQueue(uo);

 
  }

  • The SendMessageToQueue method is not all that different than the method that was written in the Customer Power Outage Application.

    private async void SendMessageToQueue(UpdateOrder  uo )
    {

        Message m = new Message(uo, new DataContractSerializer(typeof(UpdateOrder)));
      

    //Send message Asynchronously
        await uwo.SendAsync(m);
        txtStatus.Visibility = Windows.UI.Xaml.Visibility.Visible;
        txtStatus.Text = "Update Successfully Sent to Outage Management System";

        txtETR.Text = "";
        txtPowerRestored.Text = "";
    }

  • Similar to the btnUpdateETR event handler we will provide similar functionality for the Close button.  The difference is really the OrderAction property.  For the Update process we will set it to UPDATE but for closing the Order we will set it to CLOSED.

private void btnCloseOrder_Click(object sender, RoutedEventArgs e)
{

    txtETR.Text = "";
    txtStatus.Text = "";

    UpdateOrder uo = new UpdateOrder();

    uo.Address = txtAddress.Text;
    uo.City = txtCity.Text;
    uo.CustomerName = txtName.Text;
    uo.SiteID = txtSiteID.Text;
    uo.OrderAction = "CLOSED";
    uo.PowerOutDuration = System.Convert.ToDouble(txtPowerRestored.Text);
    uo.NotifyETR = isETRRequired;
    uo.NotifyPowerRestored = isPowerRestoreRequired;

    SendMessageToQueue(uo);


}

  • Much like the Customer Power Outage Application we need to provide connection strings for this communication to the Service Bus to occur.  We will create these connections within the Constructor of the GroupedItemsPage()

Queue cwo;  //Create Work Order Queue
Queue uwo; //Update Work Order Queue
bool isETRRequired = false; //Used to store the value coming from the Brokered Message Property
bool isPowerRestoreRequired = false; //Used to store the value coming from the Brokered Message Property

//Constructor
public GroupedItemsPage()
{
     cwo = new Queue("CreateWorkOrder", "Endpoint=sb://<your_namespace>.servicebus.windows.net/;SharedSecretIssuer=owner;SharedSecretValue=<your_key>");

     uwo = new Queue("UpdateWorkOrder", "Endpoint=sb://<your_namespace>.servicebus.windows.net/;SharedSecretIssuer=owner;SharedSecretValue=<your_key>");

    this.InitializeComponent();
}

  • We have now covered the ability for a PLT to retrieve a message from the Customer Queue and then provide the ability to update or close a work order.  There is still a core missing piece of functionality and that is the Notification Hub capabilities.  Much like the Customer Power Outage Application we need to go through the same steps of:
    • Adding Reference to Microsoft.WindowsAzure.Messaging.dll from the Service Bus WinRT Preview SDK.  By the way, this package includes assemblies for ARM, x86 and x64 so you are covered even if you aren’t using a Surface.
    • Associating App with App Store and allowing for Windows Notification Services
    • Enabling Toast Notifications in the Package.appmanifest
    • Creating another Notification Hub called workorderhub
    • Configuring Notification Hub to use the Windows Notification Service Package SID and Client Secret.
  • Once we have finished our Windows Notification Services and Service Bus Notification Hubs configuration we can create our Notification Hub Registrations within the App.xaml.cs  file.  The following steps need to be completed in order for the application to function properly.
  • Add the following references

using Microsoft.WindowsAzure.Messaging;
using Windows.UI.Notifications;
using Windows.Data.Xml.Dom;
using System.Threading.Tasks;

  • Add the following class level variable and then populate the constructor

sealed partial class App : Application
{

    NotificationHub notificationHub;

    /// <summary>
    /// Initializes the singleton Application object.  This is the first line of authored code
    /// executed, and as such is the logical equivalent of main() or WinMain().
    /// </summary>
    public App()
    {
        var cn =
ConnectionString.CreateUsingSharedAccessSecretWithListenAccess(
"sb://<your_namespace>.servicebus.windows.net/ ",
"<your_listenkey>");
        notificationHub = new NotificationHub("workorderhub", cn);

        this.InitializeComponent();
        this.Suspending += OnSuspending;
    }

  • In the OnLaunched method add the following method call

protected override async void OnLaunched(LaunchActivatedEventArgs args)
      {
          await InitializeNotificationsAsync();

……..

  • Create the following OnActivated method.  Much like before we will check to see if a Notification already exists.  In this case we are looking for a registration called WorkOrderAppToastReg.  If it doesn’t exist then we will create a new registration and include the tag called Airdrie.  In case you are wondering Airdrie is a small city north of Calgary in Alberta.  In this case this PLT is responsible for the city of Airdrie.  When BizTalk publishes a notification that contains the tag of Airdrie, this PLT will receive it.  Once again in a prod system, pulling this value from configuration makes more sense. 

protected async override void OnActivated(IActivatedEventArgs args)
        {
            base.OnActivated(args);
            await InitializeNotificationsAsync();
        }

        async Task InitializeNotificationsAsync()
        {
            await notificationHub.RefreshRegistrationsAsync();

            if (!await notificationHub.RegistrationExistsForApplicationAsync(
                                                             "WorkOrderAppToastReg"))
            {

                await notificationHub.CreateTemplateRegistrationForApplicationAsync(
                    BuildTextToastTemplate(), "WorkOrderAppToastReg", new string[] { "Airdrie" });

            }
        }

  • At this point we will want to make sure our application can compile and run.  In this case we will not have a message to retrieve because BizTalk is the system that will place the message on the Service Bus Queue that we are going to pull from.

Section 4: Creating  BizTalk Application

BizTalk is the ‘glue’ that is used to tie this all together.  BizTalk will perform the following functions:

  • Pull the Customer Power Outage message off of the Customer Service Bus Queue
  • Transform this message into a Work Order and place it on the Work Order Create Service Bus Queue
  • Publish a notification to the Service Bus Notification Hub that will contain the Tag of Airdrie.  The PLT that is responsible for Airdrie will receive a Toast Notification. He/She can then click the toast notification and the PLT application will launch.
  • Upon launch the PLT can click the Retrieve Message button and the Work Order will be pulled off of the Service Bus Queue.
  • The PLT can now update the work and click the Update or Close Work Order buttons.  The result is that a message will flow to the Work Order Update Service Bus Queue that BizTalk will be watching.  When a message does arrive in the Queue, BizTalk will pick it up and send it to the Outage Management System (a file drop in this scenario). BizTalk will also use the information that exists within the Work Order message to push a notification to the Service Bus Notification Hub.  Included in this Notification will be a tag that represents a Customer’s SiteID (Customer ID).  Any subscriber that has registered that tag will receive a Notification that their Work Order has been updated and an Estimated Time of Restore exists or that their Work Order has been closed that their Power has been restored.

image

  • Much like any BizTalk project, we will start with creating a few schemas:
    • Within the Customer Application a class exists called CustomerPowerOutage. From a BizTalk perspective we will generate a schema based on a sample XML file of this class.  We will use the same technique that was described in a previous post.  The end result is that we will have a BizTalk schema that looks like this:

image

  • We will also distinguish a few fields to make our lives simpler when sending Service Bus Notification messages.  These fields include:
    • Address
    • City
    • SiteID
  • The next schemas that we need to create is the PLTWorkOrder schema that is based on the class that was discussed in the PLT application.  We will also distinguish several fields to make our lives easier in Expression shapes.  Once again we will generate a schema based upon a technique found in this post.

image

  • The last schema that we are going to create is a PropertySchema.  This PropertySchema will be used to capture the “Brokered” Message properties that are being send from the Customer Power Outage application.  We will see this schema being used later in the BizTalk Administration console.  In this case both fields are of type boolean.

image

  • We will now start with the Orchestrations.  The first one is called ProcessCustomerOutage.odx.

image

  • Within this Orchestration we will receive our CustomerPowerOutage message and then transform it into an instance of a PLTWorkOrder using a map called CustomerOutage_to_PLTWorkOrder.btm

image

  • Since we want to ensure that are “Brokered” Message Properties are carried forth to our PLT application we will want to copy them within a MessageAssignment shape.

image

  • We will now send our instance of the PLTWorkOrder to the logical Send Port.
  • Finally, we will send our Service Bus Notification Hub message from an Expression shape.

image

  • We can dig into this code more by opening the OutageMangementHelper project. Within this project we will discover a helper class called OMSHelper that contains our method called SendWorkOrderNotifcations.  In order to use this code we will need to reference a Nuget Package called Microsoft.ServiceBusPreview and then provide the following using statements:

using Microsoft.ServiceBus;
using Microsoft.ServiceBus.Notifications;

  • The code itself is pretty similar to the code in the client applications.  A core difference is that we need to use the Full Access key instead of the Listen key that was used in the client applications.  Something else that you may notice is; this is where we are providing our 2 “Toast Notification” parameters that will be displayed within our Toast Notification.

public static void SendWorkOrderNotifications(string City, string Address)
{

    var cn = ServiceBusConnectionStringBuilder.CreateUsingSharedAccessSecretWithFullAccess(
"<your_namespace>", "<Full_AccessKey”>);
    var hubClient = NotificationHubClient.CreateClientFromConnectionString(cn, "workorderhub");
    hubClient.SendTemplateNotification(new Dictionary<string, string>
                                    {
                                        {"msg", "New Power Outage has been reported"},
                                        {"msg2","Location of outage is: " + Address + ", " + City}
                                    }, "Estimated Time Of Restore", City);

}

  • The next, and last, Orchestration that we are going to dive into is called ProcessWorkOrderUpdate.odx.  The purpose of this Orchestrations is to process Work Order Updates or Work Order Closes and send them to Outage Management System.

image

  • Once the message has been sent to the Logical Send Port we will detect whether or not the Work Order is an Update or a Close message based upon the content within the message and send the appropriate message to Service Bus Notification Hub.  For the purpose of these Toast Notifications we will use the same Notification Hub but we will change our message to our Customer.
  • In order to facilitate these Notification Hub messages, two methods have been created within the OutageManagementSystemHelper project called SendEstimatedTimeOfRestore and SendPowerOutageComplete. In both instances we will be specifying a tag of SiteID.  This will allow our Customer Power Outage app to receive these messages.  What this also ensures is that other Customers who currently have power will not receive these messages since the SiteID is a unique ID for customers. The code listing for both of these methods are below.


public static void SendEstimatedTimeOfRestore(string SiteID,DateTime etr)
{

    var cn = ServiceBusConnectionStringBuilder.CreateUsingSharedAccessSecretWithFullAccess(
"<your_namespace>", "<Full_AccessKey");
    var hubClient = NotificationHubClient.CreateClientFromConnectionString(cn, "PowerOutageNotificationhub");
    hubClient.SendTemplateNotification(new Dictionary<string, string>
                                    {
                                        {"msg", "Power Outage Estimated Time of Restore"},
                                        {"msg2","Your estimated time of restore is: " + etr.ToString()}
                                    }, "Estimated Time Of Restore", SiteID);

}


public static void SendPowerOutageComplete(string SiteID, double duration)
{

    var cn = ServiceBusConnectionStringBuilder.CreateUsingSharedAccessSecretWithFullAccess(
"<your_namespace>", "<Full_AccessKey");
    var hubClient = NotificationHubClient.CreateClientFromConnectionString(cn, "PowerOutageNotificationhub");
    hubClient.SendTemplateNotification(new Dictionary<string, string>
                                    {
                                        {"msg", "Power Outage has been resolved"},
                                        {"msg2","Your total outage time was: " + duration +" hours"}
                                    }, "Estimated Time Of Restore", SiteID);

}

  • We can now deploy our BizTalk Application and configure it.  Don’t forget to GAC your helper assembly!
  • Our first Receive Location is used to retrieve messages off of the Customer Queue.  In the General tab we need to specify our Service Bus Namespace and Queue Name.

image

  • Within the Authentication tab we need to provide appropriate Service Bus credentials.
  • Since our Customer Power Outage App is supplying “Brokered” Message Properties we need to specify the namespace of the Property Schema that we previously created.

image

  • The next Receive Location is used to retrieve messages from the Work Order Queue and is pretty straight forward in the sense that we need to provide our Service Bus Namespace and Queue name.

image

  • Moving onto our Send Ports we also have two.  The first is a Send Port that will use the SB-Messaging Adapter that will send a new Work Order message that will be retrieved by the PLT application.

image

  • Finally we need to create a FILE based Send Port that will send the updated or closed Work Orders to the Outage Management System.

image

Testing: Since there are a lot of moving parts I am going to try something new and record the interactions between these systems.  You can view the video below:

Service Bus Notification Hubs + BizTalk Server 2013 Beta

Conclusion

Overall I am very happy with the way that this solution works.  The funny thing is that about 1.5 years ago at my previous organization we were thinking about doing this exact scenario and supporting mobile devices.  Unfortunately that project never came to fruition but now the Service Bus Notification Hubs are out it makes it a lot easier.

Another important takeaway is that there can be some very important information that is moving through BizTalk.  I hope I have demonstrated that it isn’t to hard to use this information to generate Toast Notifications.  This concept isn’t all that new when you thing of BAM Alerting.  The difference is that we are now longer bound to just emails and can tailor an even better user experience through Toast Notifications.  Another opportunity that was not explored in this post(but maybe a future post) is that we can also update Live Tiles through this same mechanism which will only enhance this user experience.

I hope you have enjoyed this post as much as I have enjoyed putting it together.

BizTalk 2013 has reached RTM and what it means for Customers

$
0
0


Microsoft has reached another important milestone with the release of their 8th version of BizTalk.  This is the 8th release in 13 years!!!  No major product in Microsoft has shipped that often so my congratulations goes out to the team that shipped this release.   Microsoft made this announcement on Thursday, March 21 on the BizTalk Server Team Blog. Many other members within the BizTalk community have also shared this news via their blogs, Twitter and Facebook.  Here are a few examples:

Since many of these blogs, and especially the Product group blog, get into the actual features I will not re-post those since you have likely already read it.  What I did want to get into is why someone should make the jump to this version whether you are a new BizTalk customer or a customer looking to upgrade.

Back in December 2012 I started working with a new organization who was just getting started with using integration platforms to solve their integration requirements. The green light was given to proceed with implementing BizTalk.  The next question was which version do we go with?  BizTalk 2010 was very mature at this point and was the version that I was using at my previous employer.  On the flip side BizTalk 2013 had been in CTP since July 2012 and a subsequent Beta was released in early November.  I spent a lot of time with these versions(see my blog posts from this timeframe) and after speaking with the product group at the BizTalk Summit in December we all agreed that BizTalk 2013 was the way to go. 

With the help of the product group, we were able to get this organization, that I am working for, into the TAP program.  The TAP program gave me access to early bits and allowed me to start building out the various Dev, Test and Prod environments.  It also gave me access to Product Group members like Guru, Rajesh and Michael who ensured I had what I needed to make the progress required to hit my project’s deadline.  Thanks Guys :-)

My environments are now up, I have the new SCOM management pack installed and we are just finishing up User Acceptance Testing (UAT) before we are officially live.  Going live will occur in mid-April.

If I look at the drivers for going with BizTalk 2013, here are a few of them:

  • The new cloud based adapters(SB-Messaging and WCF-WebHttp) - Something that was very important to my stakeholders is having a flexible integration platform.  They do not have the appetite to spin up many types of integration platforms to perform integration.  Having one platform to deal with on-premise integration and another to deal with Cloud or SaaS just wasn’t an option.  One of the demos that I did build for the organization when we were deciding on BizTalk was to take an existing SAP interface and expose it on premise.  I then took that same interface and exposed a RESTful interface via the cloud (ServiceBus) using the new capabilities of BizTalk 2013.  Another example platform flexibility is this organization does use some Cloud/SaaS applications from large well known providers.  Having an Integration tool that can easily integrate with these solutions was a must have.  Between the core WCF adapters and the new WebHttp adapter I feel very confident that BizTalk can satisfy the integration requirements when interfacing with these Cloud/SaaS applications.
  • SFTP Adapter – This initially was not a big motivator but it has paid off.  In the past I have used the /nSoftware adapter to satisfy Secure FTP requirements.  The /nSoftware adapters are good and I have blogged about them quite a bit in the past.  When we were going through the BizTalk 2013 evaluation there were no SFTP requirements for this company.  Fast forward 3 months and 2 SFTP requirements have popped up when dealing with external partners.  In the end this turned out very well.  I didn’t have to go back to the ‘well’ to ask for more money to buy 3rd party licenses.  Instead this is an out of the box adapter which allowed me to build these SFTP interfaces very quickly.  Instead of dealing with a procurement process, I can focus on solving the problem.  That brings real value to customers.
  • Improved ESB Toolkit integration– I have used the ESB Toolkit in the past, but more from an Exception Management portal perspective.  I support any improvements that simplify the installation and reduce the amount of time it takes to deploy.  In BizTalk 2013, Microsoft has simplified the ‘core installation’ of the ESB Toolkit.  This is a MUCH better experience and I applaud their efforts.  I still think there is an opportunity to take this one step further though.  Simplify the installation of the Exception Management Portal.  I know this is designated as a ‘sample solution’ that you can adopt for your own use but why not improve the experience and give customers a complete experience?  Another area of improvement is updating the Alerting Service that will look for exceptions in the Exceptions Database and then send alerts to people who have subscribed to them from the Exception management portal.  This Alerting service is extremely useful but is currently broken as part of this release.  The Alerting Service has a dependency on Microsoft Enterprise Library 4.1 and the core ESB Toolkit is using Microsoft Enterprise Library 5.0.  I haven’t had the time to dig in and find a resolution but my advice would be to include both the Exception Portal and Alerting service as part of the core product and then wrap the same, simplified installation that has been provided for the core framework.
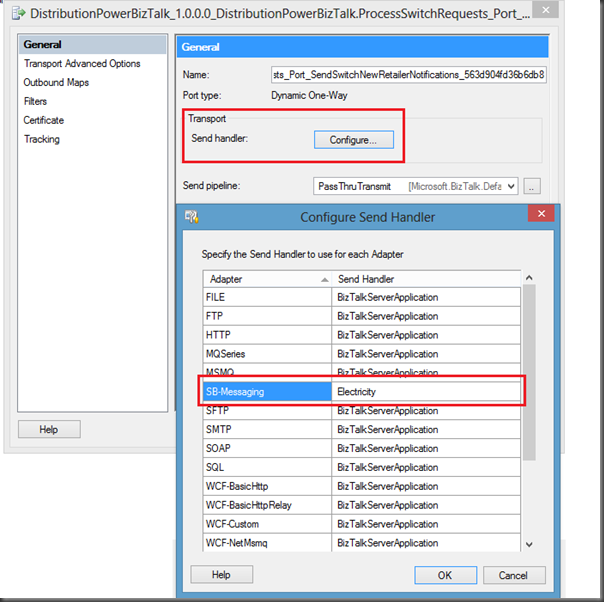
  • Improved SharePoint Adapter experience– In a prior life, I did a lot of integration between BizTalk and SharePoint.  I even wrote a couple chapters on it in the BizTalk LOB book.  One of the unfortunate realities of the previous SharePoint adapter is that you had to install an adapter web service on SharePoint servers.  As you can imagine, the people who are responsible for SharePoint within organizations are not thrilled with this approach.  As someone who is walking into a new organization, you are not going to make a lot of friends if you need to install ‘BizTalk bits’ on their servers. In SharePoint 2010, the Client Object Model was introduced to allow developers to programmatically add/modify/remove content from SharePoint (in addition to many other things).  BizTalk has now adopted this same model and is leveraging this Client Object Model within the Adapter.  The Adapter Web Service still exists to allow for backwards compatibility during migrations but you can now use the SharePointAdapter and specify using the Client Object Model instead.  Another benefit of using the Client Object Model approach is BizTalk is now able to use this same adapter to communicate with Office 365.  This new organization that I am working with also has some plans to use Office 365 in the future so I am anticipating that the Client Object Model will be leveraged in the near future.  I also won’t have to beg the SharePoint team to install the ‘BizTalk bits’ on their on-premise SharePoint servers.
  • BizTalk Infrastructure as a Service (IaaS) – This is a feature that was included as part of the Beta and will be included as part of the core offering as well.  While I am not going to go out on a limb and say that I will leveraging this for production right away but I like to have the option.  Having recently gone through the process of creating Dev, Test and Prod environments it can be time consuming.  By time consuming, I am not referring to the actual BizTalk installation and configuration.  Many other time consuming tasks need to take place including procuring servers (either physical or virtual), storage, Active Directory groups and accounts, SQL Server instances etc.  Having the ability to spin up a BizTalk environment in Azure in minutes is attractive.  For my needs, I can see myself leveraging these type environments in Project settings where you can’t disrupt the current Dev/Test/Prod Landscape but we will see how this progresses.  One thing is certain though, having options is good.

Conclusion

There are a lot more features that are included in this BizTalk 2013 release than I have described here.  I thought it would be interesting to describe some of my thought process when going through the BizTalk 2010 vs BizTalk 2013 decision.  Now that BizTalk 2013 has RTM’d this decision gets even easier.  I am very glad that I did proceed down the 2013 route as otherwise I would be missing out on a lot of great features.

Also, stay tuned for some more announcements from the BizTalk team.  They are working on something BIG that fits into the Platform as a Service (PaaS) space. Hint – it is related to this.  Once again having options is good and the service that will be offered provides customers more options when it comes to cloud integration.  BizTalk developers will be happy as a lot of their existing skillset can be leveraged while building out some new capabilities using this upcoming platform.  Stay tuned – it is worth it.

BizTalk Monitoring Whitepaper is now available

$
0
0

For the past month and half, in my spare time, I have been working on a whitepaper that compares and contrasts System Center Operations Manager (SCOM) and BizTalk360. 

I have used both products extensively in my professional life and in order to remain objective within the paper I have driven my evaluation off of requirements.  These requirements are based upon my experience of managing the 24x7 operations of a BizTalk environment at a large Power Distribution company in Canada.
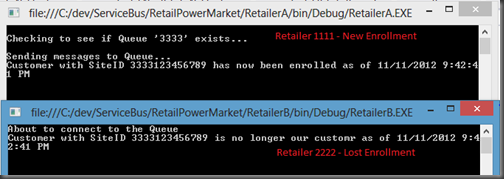
The paper can be downloaded from here and feel free to leave any comments that you may have below.

I would also like to thank Steef-Jan Wiggers for being a technical reviewer on this paper.  He provided me with some valuable feedback that increased the quality of the paper.


BizTalk 2013 CU1 has been released

$
0
0

The product team recently announced that BizTalk 2013 CU1 has been released. Within the CU there are 3 issues that are fixed:

  1. User cannot perform certain database-related operations in BizTalk Server 2013
  2. BAM tools cannot be configured in a multi-node BizTalk Server 2013 environment
  3. The vertical scroll bar on the target schema does not work correctly when
    you use Visual Studio to design a BizTalk Server 2013 map

Personally, the only issue that I have noticed was item number 2.  It is nice to see this fixed as I was having a horrible time configuring BAM in a multi-server environment.  I definitely recommend installing the update.  This time around, Microsoft is delivering these updates via the Windows Update process.  Overall, the process is painless and rather convenient.  Windows Update will not automatically install these updates, they are something that you need to “opt in” for.

To install the update:

  • Launch Windows Update

image

  • Check for updates

image

  • You should discover a BizTalk 2013 section as part of the Important Updates.  If you want additional info, click on the More Info link on right hand side.

image


Note: The KB article indicates A reboot is not required, however I was prompted for a reboot but that must be related to the Windows Server Updates.


Upcoming Speaking Engagements

$
0
0

I am happy to announce a couple of upcoming speaking events:

May 1st – Phoenix Connected Systems User Group in Tempe, Arizona

Introducing BizTalk 2013 and the new Cloud adapters

Microsoft recently released their 8th version of BizTalk called BizTalk Server 2013. One of the new capabilities in this version is the ability to use out of the box adapters when communicating with Windows Azure Service Bus endpoints and other Software as a Service (SaaS) solutions. In this session Kent will focus on exposing Line of Business services to the cloud using the new WCF-BasicHttpRelay, SB-Messaging and WCF-WebHttp adapters. This session will include some slides and lots of demos including exposing SAP information to a mobile device using these technologies.

May 6th/7th  - BizTalk Boot Camp in Charlotte, North Carolina

BizTalk 2013 - New cloud-based BizTalk Server adapters

This session will also focus on the new Cloud based adapters for BizTalk Server 2013.  I will be demonstrating some of the new capabilities found in the BasicHttpRelay, SB-Messaging and WCF-WebHttp adapters.

Presentation from recent talks

$
0
0

In the past week I have had the opportunity to speak at two events.  On May 1st I spoke at the Phoenix Connected Systems User Group and on May 6th I gave two presentations at the BizTalk Bootcamp in Charlotte.
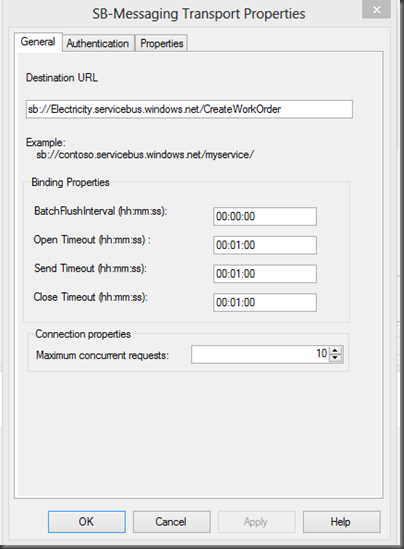
It was a lot of fun putting these demos together and I received a lot of good feedback so hopefully you will also benefit from them.  You can find the slide deck here: http://sdrv.ms/12fBU53

Note: Some of the Service Bus slides were borrowed from Clemens Vasters’ deck which he has made freely available here.

BizTalk 2013: WCF-SAP Adapter using Messaging Servers

$
0
0


SAP supports a few different architectures when it comes to scaling out.  In some environments, mainly smaller environments, the components that facilitate sending and receiving messages (such as IDOCs, BAPIs or RFCs) may be co-hosted on an Application Server.  In some larger environments a dedicated Messaging Server(s) may be provided. We can also use a named destination that we define in our saprfc.ini file.

Up until this point all of my experience integrating with SAP has occurred through an Application Server.  This is the default Connection Type that is populated in the Send Port configuration of a WCF-SAP send port.

image

Recently I ran into a situation where the SAP environment was not using Application Servers.  Instead a Messaging Server was being used.  The end result was that I received the following error
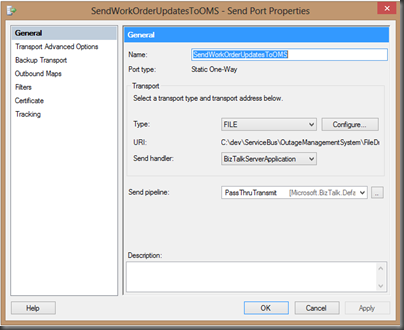
 

A message sent to adapter "WCF-SAP" on send port "SendGetSAPEquipment" with URI "sap://CLIENT=010;LANG=EN;@b/*SAPSERVER*/*ENV*?RfcSdkTrace=False&AbapDebug=False" is suspended.
Error details: Microsoft.ServiceModel.Channels.Common.ConnectionException: Details: ErrorCode=RFC_OK. ErrorGroup=RFC_ERROR_COMMUNICATION. SapErrorMessage=Connect to message server failed
Connect_PM  MSHOST=*MSHOSTValue*, R3NAME=*ENV*, GROUP=PUBLIC

LOCATION    CPIC (TCP/IP) on local host with Unicode
ERROR       service *SAPSERVER* unknown
TIME        Tue Apr 23 09:38:18 201
RELEASE     700
COMPONENT   NI (network interface)
VERSION     38
RC          -3
MODULE      nixxhsl.cpp
LINE        776
DETAIL      NiHsLGetServNo: service name cached as unknown
COUNTER     1.  AdapterErrorMessage=. ---> Microsoft.Adapters.SAP.RFCException: Details: ErrorCode=RFC_OK. ErrorGroup=RFC_ERROR_COMMUNICATION. SapErrorMessage=Connect to message server failed
Connect_PM  MSHOST=*MSHOSTValue*, R3NAME=*ENV*, GROUP=PUBLIC


Microsoft.ServiceModel.Channels.Common.ConnectionException: Details:
ErrorCode=RFC_OK. ErrorGroup=RFC_ERROR_COMMUNICATION.
SapErrorMessage=Connect to message server
ailed
Connect_PM  MSHOST=*MSHOSTValue*, R3NAME=*ENV*, GROUP=*MyOrganization*

Since the SAP environment was actually using Messaging Server(s), In order to successfully make a connection to SAP, here is the correct configuration that I needed to provide:

  • Application Server Group Name
  • Message Server Host
  • R/3 System Name
  • Connection Type B

These properties will be specific to your environment and therefore I have blacked them out.  You will need to get this information from your BASIS admin.

image


However, this is not enough and this is where I got hung up.  You also need to specify TCP port where SAP will be looking for these connections.  This property is not exposed through the BizTalk GUI.  In order to specify this TCP port you need to modify the following file:

C:\Windows\System32\drivers\etc\services

Within this file you will want to add an entry like:


MSHOST            1234/tcp   # SAP ENV System Message Server Port

Once again these values will be specific to your environment.  I have added fictitious values here.  You may see something like SAPMS<ENV> but once again your mileage may vary.  In all likelihood your TCP Port will not be 1234 (that I made up).  It will likely be 4 digits though.

The most important thing to recognize is that the value in this file (that I have called MSHOST) must match the value that we see in the error message below.  This value will not match any values within your Send Port.


image

It isn’t only BizTalk that will use these values.  Your SAPGUI will also use these same values when connecting to SAP systems.  So if you are stuck, my recommendation is to find a machine that is running the SAPGUI and then copy over those values to the file that exists on your BizTalk Server(s).  I have no idea how this MSHOST value is looked up as the BizTalk Send Port has no knowledge of it. My guess is that at runtime the R3Name in combination of the Message Server Host is somehow used to lookup this MSHOST from this file.


Conclusion

Hopefully this blog post will save you some time.  I know that I had a tough time finding information that clearly painted the picture for me...especially in the area of the port# that is found in our services file.

Introducing Windows Azure BizTalk Services Preview –Part 1

$
0
0


On Monday, June 3rd Microsoft announced the Preview of Windows Azure BizTalk Services (aka WABS or just BizTalk Services).  Windows Azure BizTalk Services is a managed service provided by Microsoft.  More specifically you can think of BizTalk Services as a Platform as a Service (PaaS) offering.  Recently, I had an opportunity to work with this platform as I was involved in an NDA event in New York City.  While I was preparing for that presentation I took the opportunity to document some of my learnings so that I could share them when the content was no longer considered NDA.  With the TechEd announcement this information is now considered public hence the timing of this blog post.

The purpose of this offering is to provide customers a way to execute integration scenarios in a cloud based environment.  The idea is that you would design and build your interfaces locally within Visual Studio and then deploy your interface to the cloud where it is executed.

Conceptually we can think of a Windows Azure BizTalk Services much like any other interface that utilizes an Integration platform.  We have source systems, an intermediary where we can perform functions like Message Validation, Enrich, Transformation and Enrich (aka VETE).  We then have the ability Route our message to the appropriate destination system.  The difference with this platform is that the “heavy lifting” is occurring in the Windows Azure cloud as opposed to our On-Premise BizTalk Servers.

image


There are some subtle differences between Windows Azure BizTalk Services and BizTalk Server 2013 (On-Premise) solutions.  I say subtle because for an experienced BizTalk person these new concepts are not that big of a leap.  Below is s diagram containing some of the key artifacts and components that make up a BizTalk Service solution.

image

Bridges

The term that jumps out at you is probably Bridges. What is a Bridge? A Bridge is a message processing entity.  Probably the closest BizTalk construct that you can relate a Bridge to is an Orchestration but there are differences.  The reason why Orchestration is “kinda close” is that it groups a series of action or processes together within one logical container.

image

Bridges include Sources, Pipelines and Destinations.  Currently within the Windows Azure BizTalk Services Preview we have 3 types of Bridges:

  • Xml One-Way Bridge
  • Xml Request-Reply Bridge
  • Pass-Through Bridge (for message transport)

Within a Pipeline we can call transformations, perform validations, encode, decode or enrich messages.

We also have 3 types Source types:

  • FTP/S
  • HTTP
  • SFTP

and 9 Destination types:

  • FTP
  • One-Way External Service Endpoint (No Service Bus connectivity)
  • One-Way Relay Endpoint (Service Bus connectivity)
  • Service Bus Queue
  • Service Bus Topic
  • SFTP Destination
  • Two-Way External Service Endpoint
  • Two-Way Relay Endpoint (Service Bus connectivity)

Technically this Destination list is not fully complete.  We also have the ability to communicate with On-Premise LOB systems which I will go through in another Blog Post.

SDK Installation

Even though our BizTalk Services run in the cloud, we still perform our development activities within Visual Studio.  Currently Visual Studio does not ship with the appropriate templates that allow us to build BizTalk Services solutions.  However, we can get these templates from the Windows Azure BizTalk Services SDK.

The installation is pretty straight forward and I have included some screen shots below.

Note: On 64 bit machines only need to install the 64 bit SDK


image


image

image

image

image


Visual Studio Experience

When we launch Visual Studio 2012 we will discover a new C# templates under the BizTalk Services node:

image

If we choose BizTalk Service we see a blank diagram that allows us to drop a Bridge and Source or Destination endpoints onto it.

image

If we choose BizTalk Service Artifacts we will see a new project that does not include a bridge but a Transformation (map) and two sample schemas.

image

If we choose the BizTalk Service Project template we have more capabilities as we can drop any of the following Artifacts/Actions onto our canvas.

image


In the image below I have modeled a scenario just to visualize what building an interface in BizTalk Services may look like.  In this scenario we are a company that specializes in managing Request For Information (RFI) processes. Organizations that have projects that they would like vendor responses to will send us these requests and we will publish this information to our trusted vendor network that allow them to be informed of these opportunities. 

In this scenario I have an XML One-Way Bridge which will expose an HTTP(s) Endpoint.  Within this bridge we will perform an transformation from the message type that was sent by our customer requesting RFI information into a message type that all of our Vendor partners are expecting. Once we have transformed this message, we need to drop it on a Service Bus topic. 

image

Much like a BizTalk Server project we will start with our schemas.  This schema editor is very similar, if not the same, as the BizTalk Server schema editor. The first schema that we will build represents our client request.


image

Next we will create a schema that we use with our strategic vendors who subscribe to our service. You will notice that there are more fields in the partner schema.  This is where the value of our firm comes from as we have direct communication with client and have some additional insight into their project about whether the project is likely to proceed and will also expose the name of the customer.  Typically these values would be looked up from a CRM system but for now we will keep it simple and include it in the map.

image

Next we will add a Transformation(or Map) to our solution that will allow us to transform our CustomerRequest into a PartnerRequest message.

Getting deep into the mapper is outside the scope of this post but you will see some new “functoids” or what are now being called Message Operations.  Some of these new capabilities include ForEach, MapEach, If-Then-Else, List Operations and YES you can call custom code.

image

Once we have defined our Schemas and Maps we can now configure our XML Bridge.  Within this bridge we will specify our message type that we will be receiving (CustomerRequest).  We will also specify our Xml Transform (Map).  Since we are not dealing with flat files and do not have any Validation requirements we will leave those stages in their defaulted stage.

image

We now need to wire up the output of our Bridge to our Destination endpoint which is a Service Bus Topic.  We will do so by selecting a Connector operation and then connect the dots(kinda like in Viso) between our Bridge and Topic endpoint.


image

Now remember that we can perform message routing in BizTalk Services.  To set our Routing patch we will need to click on the line that we drew from our Bridge to our Topic.

image

We now need to click on the Filter Condition.  In this case we are not going to restrict any messages from continuing to our topic so we will select Match All but we do have the ability to create a filter based upon message content.

image

Next we will change our focus to the Service Bus Topic.  We need to configure this endpoint by clicking on it and then modifying the PartnerTopic.config (filename will vary) file for it.  Within this config file we will specify our Service Bus namespace, topic name,Issuer Name and Key.  Please note that these are production Service Bus entities and have nothing to do with the BizTalk Services Preview environment.

image

We also want to rename our XMLOneWayBridge so that we are not using the default name since this name will makeup part of our URI. 

image

Lastly we want to specify our endpoint where our Bridge can be contacted. To do this click on any empty space on the canvas and then modify the Deployment Endpoint.  (Note the endpoint below is fictitious).

image

At this point we can now deploy our solution to Windows Azure BizTalk Services.  We can do so by right mouse clicking on our Visual Studio Solution and selecting Deploy Solution. Here is where we want to specify our BizTalk Services environment configuration.  You cannot use your Production Windows Azure credentials here.

image

The deployment only takes a few seconds and when it is completed we should see a message like the following:

image

Testing

Part of the SDK that we just installed includes utilities that can be used when Sending and Receiving messages to/from BizTalk Services.  We are going to go ahead and leverage the MessageSender application.

The Message Sender Application is a command line tool that is expecting the following inputs:

  • ACS Namespace (for BizTalk Services environment)
  • Issuer Name
  • Issuer Key
  • Bridge Endpoint Address
  • File location to message you want to send
  • Content Type

image

The result is that our message has been sent to our bridge successfully.

image

If we go to the Windows Azure Production portal we will discover that we have a message within our Subscription.

image

Conclusion

If some of this looks familiar it is because it is!.  This is the evolution of what use to be called Windows Azure EAI/EDI Labs.  It is now being branded underneath the “BizTalk” brand which makes sense on a few levels in my opinion.  For instance the team that is working on this new service is the same team responsible for the BizTalk Server product.  One thing you will hear the product team speak to is that there is “ONE BIZTALK”. One platform with many capabilities including BizTalk Server On-Premise, BizTalk Server running as Infrastructure as a Service (IaaS) and now BizTalk Services which is running as a Platform as a Service offering.

There is another huge aspect to BizTalk Services that has been neglected from this post as I just am not familiar with it but EDI in the cloud also makes up a substantial part of this offering and arguably provides the greatest area of opportunity.

I am just getting started with blogging about BizTalk Services.  Stay tuned for my next post on how to integrate On-Premise Line of Business Applications(SAP)  with BizTalk Services.

Windows Azure BizTalk Services Preview (Part 2) –BizTalk Adapter Services SAP Integration

$
0
0


Over the past 7 years I have spent a lot of time integrating BizTalk and SAP systems.  I probably built more interfaces for SAP than any other system.  When new technology such as Windows Azure BizTalk Services surfaces I am always interested to understand what the experience looks like.

If you read my prior post in this series, you are probably wondering how it is possible to use Windows Azure BizTalk Services in the Windows Azure Cloud and connect to your On-Premise LOB Systems like SAP?  Enter BizTalk Adapter Services.

BizTalk Adapter Services allows us to use the BizTalk Adapter Pack in order to connect to LOB systems.  The BizTalk Adapter Services are hosted in IIS and leverage the Service Bus Relay (under the hood) in order to traverse Firewalls and NATs.  Using the BizTalk Adapter Service is just another tool in our toolbox when achieving Hybrid integration.

image

Adapter Services Installation

I am now going to quickly install the BizTalk Adapter Services and then provide a walkthrough of how we can integrate with SAP.  The scenario that we are going to walk through is part of a larger process that I won’t get into much detail within this blog but we have an SAP process were we need to feed sub-systems within the organization with Equipment data from SAP.  We will get this equipment by calling a custom SAP RFC(BAPI).

The BizTalk Adapter Service is a component that we want to install on a Server within our Network.  This machine does not require BizTalk Server to be present.

image


image

image

This is an important step as the account that we specify here will require access to SQL Server where configuration will be stored about our Relay Endpoints.

image

In this case I am using a local SQL Server instance.  You can use SQL Express if you so desire but I have leveraged SQL 2008 R2 (SQL Server 2012 is also supported).

image

This step kinda reminds me of the BizTalk SSO Service password but they are not related or linked.

image

The BizTalk Adapter Service installation will be installing a Management Web Service.  Since I am just using this for demo purposes I did not enable SSL. 

image

Once we have finished installing the BizTalk Adapter Service we will discover a new database called BAService.

image

We will also discover a new entry in Server Explorer within Visual Studio called BizTalk Adapter Services

image

If we right mouse click on BizTalk Adapter Services we have the ability to add a BizTalk Adapter Service by specifying the URL of the Management Service that was created as part of the installation process.

image

Once this Adapter Service has been added we can expand it and discover our LOB Targets.

image

We can add a new SAP target by right mouse clicking on SAP  and selecting Add SAP Target.

image

We now need to specify our SAP connection information much like we would if we were adding Generated Items within a BizTalk Server 2013 solution.  We need to specify the Application Server, the System Number, Client and Language.  I recently blogged about connecting to SAP Messaging Servers.  Not to worry these more advanced scenarios are supported by clicking on the Advanced button.

Next we need to provide our SAP credentials if we are not using Windows Credentials.

image

Much like the BizTalk Server experience we can search operations including IDOCs, BAPIs and RFCs.  Do note that at this point we are only able to push messages to SAP.  This means we can send an IDOC and call a BAPI/RFC and get the response back.  SAP cannot push IDOCs or call an RFC that is hosted by the BizTalk Adapter Service. 

Once we have found the artifact that we are looking for we can add it to the Selected operations list and then click the Next button.

image

Once again need to provide credentials that the BizTalk Adapter Service will use to connect to SAP.

image

This gets a little interesting.  Much like in my previous blog post where we connected to a Service Bus Topic, we will use the production Service Bus connectivity information.  So in this case I am going to leverage an existing Service Bus Namespace and credentials to enable Service Bus Relay capabilities.

We also have the ability to specify a Target sub-path that just allows us to organize our endpoints.

image

We now have a confirmation page that we can just click the Create button in order to finish the wizard.

image

With our SAP LOB Target created we can now drag that Target onto our canvas:

image

At this point we have just created an SAP target and added it to our canvas. but we have not actually generated our schemas that will be used within our solution.  In order to generate these schemas we need to right mouse click on our SAP LOB Target and specify Add Schemas to Project.

image

We will once again be prompted for SAP credentials.

image

Within our solution, we will now find two schemas have been added.  One is the core schema and the other is a schema for data types leveraged by the core schema.

image

A Web Request Schema, that we will expose externally to calling applications, is also needed.  This schema is very simple with only two fields: Plant and EquipmentName.

image

Next we need to add a Map that will allow us to transform our Web Request message into our SAP Request message.

image

The map is pretty straight forward as we only need to map a couple fields.

image

A Map that will allow us to transform our SAP Response into our Web Response is also required.

image

Next, we need to add  an Xml Request-Reply Bridge to our canvas by dragging it onto our canvas.

image

We now want to modify the Property page for this artifact  as it will become part of our overall URI.

image

By double clicking on our  Bridge, we have the ability to configure it.  Within this configuration we will want to specify the Message Type for the message that we will be receiving from the calling application and the Message Type for the type of message we will be sending back to the calling application.

We also want to specify our two Transformations.  The first one will take our Web Request and map it to our SAP Request.  The second Transformation will take our SAP Response and map it to our Web Response.

image

Once our Bridge has been configured, we need to connect our Request Response Bridge to our SAP LOB Target.  We can do so by dragging a Connector from our Toolbox and connecting our Bridge to our SAP LOB Target.

image

image

Routing messages is a core functionality within BizTalk Services. In order to route messages, we need to provide a filter condition that will allow us to specify messages to flow between the Bridge and the SAP LOB Target. In order to set this filter we need to click on the line that connects these two artifacts and then click on the Filter Condition.

image

Since we want all messages to flow to this LOB system we will choose Match All and click the OK button.

image

We also need to specify a SOAP Action much like we need to do with BizTalk Server.  In order to do this we need to highlight the connection between the Bridge and LOB target and then click on Route Action.

image

In this case we want to specify a SOAP Action and then specify the action from our Request Schema.  Much like the EAI/EDI Labs solutions we want to wrap our Expression around single quotes( ‘   ‘)

image

We are now almost ready to deploy our solution but before we can do that we need to specify our Deployment Endpoint.  We can do so by clicking on any blank space on our canvas and then specifying our Deployment Endpoint address in the Property page.

image

Deploying our solution is as simple as right mouse clicking on our Visual Studio Solution file and selecting Deploy Solution.

image

In order to deploy our solution we will need to provide the Deployment Endpoint, ACS Namespace(for BizTalk Service environment), Issuer Name and Issuer Shared Secret.

image

Within a few seconds our solution will be deployed and will be ready for testing. Once again I can  use the MessageSender application that is part of the BizTalk Services SDK. But, since looking at a black screen with white xml text isn’t very appealing, I created an ASP.Net Web application and borrowed the MessageSender class from the SDK project.  In this case I have my Web Application running on a laptop that isn’t on the same network as the machine that is hosting the BizTalk Adapter Service.


image

Within the web application, we have the ability to provide a Plant and a wild card string representing a piece of equipment in order to get more details about where that piece of equipment has been deployed, the Manufacturer and Model Number.

image


Conclusion

Hopefully this walkthrough has provided you with some valuable insight on what it takes to integrate a Line of Business system like SAP with Windows Azure BizTalk Services.  I can certainly envision scenarios where an organization uses an LOB system like SAP but may not have a dedicated integration platform to perform some of this integration. Windows Azure BizTalk Services may fill this void and enable some business scenarios that just may not have been possible for that organization.  Consider another situation where you may have a SalesForce system that requires SAP data (maybe Equipment data Smile ) and this type of functionality in BizTalk Services really becomes a business catalyst.

I also think that the BizTalk Adapter Service may provide some interesting Mobile use cases as well as we can now expose SAP data through the cloud in a secure manner.

While the scenario is a bit dated, I also wrote a similar article on how to submit IDOCs to SAP using the Windows Azure EAI/EDI Labs CTP which has now been superseded by Windows Azure BizTalk Services.

Viewing all 75 articles
Browse latest View live